FloppySend's APIs
Use our simple APIs to integrate SMS text messaging, Email and more services with your already existing business applications and systems.
What is APIs?
API stands for Application Programming Interface. In basic terms, APIs are a set of functions and procedures that allow for the creation of applications that access data and features of other applications, services, or operating systems.
Programmers on both sides of the application use a standard protocol (API specification) to make this connection. “API” refers to this protocol as well as to the service performed via the use of the API.
FloppySend offers a range of APIs to allow programmers to design software to interact and integrate with our service. In some cases, existing software with the necessary capability can simply be configured to use one of our APIs, without any custom coding needed.
An SMS API is a code that allows one platform to talk to another.
Think of it as a handshake between two people, a bond is created and information can then be shared.
The code takes certain criteria from the system, along with authentication keys,
and turns them into a ‘readable’ and usable format for your system and Clickatell.
SMS API Introduction
FloppySend SMS API is created for developer by developers.
In this guide we will be explicit as much as possible to make usage of API simple and get you ready to start.
A SMS API is well-defined software interface which enables code to send short messages via a SMS Gateway. Use our simple SMS APIs to integrate SMS text messaging with your already existing business applications and systems.
As the infrastructures for SMS communications and the internet are mostly divided, SMS APIs are often used to 'bridge the gap' between telecommunications carrier networks and the wider web.
SMS APIs are used to allow web applications to easily send and receive text messages through logic written for standard web frameworks.
FloppySend offers both API endpoints which you can hit with any language, as well as a selection of Helper Libraries which help to build complex communications services into products in little time.
To use our SMS API, you need an API key in order to be identified within our system. It is provided to you at registration, and is available from your user profile.
SMS Parameters
Request Types
-
GET: If the request is get method you need to append params as query string inside the params section:
-
POST: If request is post method you need to append params as x-www-form-urlencoded inside the body of the request
https://api.floppy.ai/smsYou can get your X-Api-Key And X-Secret-Hash from your account setting page in Api Keys section
{
    X-api-key:"Your x-api-key" (string required)
    X-Secret-Hash:"Your x-secret-hash"
    (string required if added from dashboard)
}
Note:
Due to data protection reasons the API is only accessible via HTTPs with TLS versions 1.0, 1.1 or 1.2.
|
Parameter |
Type |
Required |
Description |
|---|---|---|---|
|
To |
string |
Yes |
number/numbers sending to |
|
From |
string |
Yes |
sender which will appear to the user |
|
Dcs |
string |
Yes |
if message contains unicode:
8, |
|
Text |
string |
Yes |
message body |
|
sched |
string |
Optional |
You may schedule sending messages by setting the sending DateTime parameter using the ISO format. |
SMS Response
Success Responses
|
Key |
Value |
|---|---|
|
Status |
Sent |
|
ID |
Response_Id |
|
Error_Code |
0 |
|
Error_Desc |
0 |
{
    "Result": "Success",
    "Datainfo":
    [
        {
            "Status": "Sent",
            "ID": "Response_Id",
            "Error_Code": "0",
            "Error_Desc": "0"
        }
    ]
}
|
Http Error Code |
Error Code |
Error Description |
Note |
|---|---|---|---|
|
400 |
10 |
Invalid From Parameter |
|
|
400 |
10 |
Invalid From Parameter (Alphabet Max 11 Digit) |
|
|
400 |
11 |
Invalid To Parameter |
|
|
200 |
69 |
Insufficient account balance |
|
|
400 |
85 |
Invalid Message Text |
If text is empty or param doesnt exist |
|
400 |
97 |
Invalid Sched Parameter (DateTime ISO Format yyyy-MM-ddTHH:mm:ss) |
If sched is invalid |
|
400 |
255 |
Unknown Error |
|
|
400 |
260 |
Invalid Dcs Parameter (Text=0 Unicode=8) |
When the number of Dcs is not 0 or 8 |
|
400 |
260 |
Invalid Dcs Parameter |
When Dcs param is empty or not included |
|
200 |
303 |
Country/Network not available |
|
|
403 |
403 |
Invalid secret Hash! |
|
|
403 |
403 |
Api Key Not Found! |
|
|
404 |
404 |
Missing Api Key From Header |
|
|
404 |
404 |
Demo Account Expired |
|
|
404 |
404 |
Missing Secret Hash From Header |
|
|
429 |
429 |
API calls quota exceeded! maximum admitted 1 per 1s/ or according to your SMS plan rate limit. |
|
|
500 |
500 |
Unknonw Error |
|
X-Secret-Hash
To send a message with a X-Secret-Hash, you will need to use the X-Secret-Hash which can be set at your account settings under API Keys section. You will also find the Signature Method to choose which signing algorithm to use.
The default algorithm is 'MD5 hash' and we also support SHA1 HMAC, SHA-256 HMAC, SHA-384 HMAC, and SHA-512 HMAC.
So when you are sending the request you need to encrypt your API Secret value according to your selected Signature Method and then use that value when you are sending the request, for example:
If you set your API Secret to = mysecret and your selected Signature Method
is MD5 HASH then the value will be:
06c219e5bc8378f3a8a3f83b4b7e4649,
then you can use this MD5 value in the API request at the header of
X-Secret-Hash
The process for sending a signed message is as follows:
-
Create a signed request to send an SMS.
-
Check the response codes and ensure that you sent the request correctly.
-
Your message is delivered to the handset. The user's handset returns a delivery receipt.
If you set X-Secret-Hash value and did not generate the signature correctly the status is 403, Invalid secret Hash. You can find more information about the error codes in the Error Responses section.
SMS Code Sample
Note:
you need to add your "X-Secret-Hash" in the header if you have one.
$curl = curl_init();
curl_setopt_array($curl, array(
    CURLOPT_URL => 'https://api.floppy.ai/sms',
    CURLOPT_RETURNTRANSFER => true,
    CURLOPT_ENCODING => '',
    CURLOPT_MAXREDIRS => 10,
    CURLOPT_TIMEOUT => 0,
    CURLOPT_FOLLOWLOCATION => true,
    CURLOPT_HTTP_VERSION => CURL_HTTP_VERSION_1_1,
    CURLOPT_CUSTOMREQUEST => 'POST',
    CURLOPT_POSTFIELDS =>
    'to={to_number}&from={sender}&dcs={dcs}&text={message_body}&sched=2021-07-02T11%3A16%3A28',
    CURLOPT_HTTPHEADER => array(
    'x-api-key: "Your x-api-key"',
    'Content-Type: application/x-www-form-urlencoded'
                                ),
    ));
$response = curl_exec($curl);
curl_close($curl);
echo $response;
require "uri"
require "net/http"
url = URI("https://api.floppy.ai/sms")
https = Net::HTTP.new(url.host, url.port)
https.use_ssl = true
request = Net::HTTP::Post.new(url)
request["x-api-key"] = "Your x-api-key"
request["Content-Type"] = "application/x-www-form-urlencoded"
request.body =
"to={to_number}&from={sender}&dcs={dcs}&text={message_body}&sched=2021-07-02T11%3A16%3A28"
response = https.request(request)
puts response.read_body
//The OkHttpClient is an external package, you need to install it before making the request,
//And don't forget to add user permission for the internet inside "\MyApplication\app\src\main\AndroidManifest.xml"
//Also, you need to add required dependencies inside "MyApplication\app\build.gradle"

OkHttpClient client = new OkHttpClient().newBuilder()
.build();
MediaType mediaType = MediaType.parse("application/x-www-form-urlencoded");
RequestBody body = RequestBody.create(mediaType,
"to={to_number}&from={sender}&dcs={dcs}&text={message_body}&sched=2021-07-02T11:16:28");
Request request = new Request.Builder()
.url("https://api.floppy.ai/sms")
.method("POST", body)
.addHeader("x-api-key", "Your x-api-key")
.addHeader("Content-Type", "application/x-www-form-urlencoded")
.build();
Response response = client.newCall(request).execute();
var client = new RestClient("https://api.floppy.ai/sms");
client.Timeout = -1;
var request = new RestRequest(Method.POST);
request.AddHeader("x-api-key", "Your x-api-key");
request.AddHeader("Content-Type", "application/x-www-form-urlencoded");
request.AddParameter("to", "{to_number}");
request.AddParameter("from", "{sender}");
request.AddParameter("dcs", "{dcs}");
request.AddParameter("text", "{message_body}");
request.AddParameter("sched", "2021-07-02T11:16:28");
IRestResponse response = client.Execute(request);
Console.WriteLine(response.Content);
//Make sure to import Axios and install npm packages before doing the request

var axios = require('axios');
var qs = require('qs');
var data = qs.stringify({
    'to': 'TO-NUMBER',
    'from': 'FROM-SENDER',
    'dcs': '0',
    'text': 'MESSAGE-BODY',
    'sched': 'Time-IsoFormat'
});
var config = {
    method: 'post',
    url: 'https://api.floppy.ai/sms',
    headers: {
        'x-api-key': 'YOUR-API-KEY',
        'Content-Type': 'application/x-www-form-urlencoded'
    },
    data: data
};

axios(config)
    .then(function (response) {
        console.log(JSON.stringify(response.data));
    })
    .catch(function (error) {
        console.log(error);
    });
SMS Legacy
FloppySend provide APIs for SMS in old version, where user can use username & password as request parameters, you may get your SMS legacy password from your account dashboard at Legacy Api settings.
Legancy Parameters
-
GET: If the request is get method you need to append params as query string inside the params section
-
POST: If request is post method you need to append params as x-www-form-urlencoded inside the body of the request
https://api.floppy.ai/smslegacyNote:
Due to data protection reasons the API is only accessible via HTTPs with TLS versions 1.0, 1.1 or 1.2.
|
Parameter |
Type |
Required |
Description |
|---|---|---|---|
|
Username |
string |
Yes |
username for the user can be seen in the account page under legacy tab |
|
Password |
string |
Yes |
password for the user can be seen in the account page under legacy tab which the user can change |
|
To |
string |
Yes |
number/numbers sending to |
|
From |
string |
Yes |
sender which will appear to the user |
|
Dcs |
string |
Yes |
if message contains unicode: 8, if message doenst contain unicode: 0 |
|
Text |
string |
Yes |
message body |
|
sched |
string |
Optional |
You may schedule sending messages by setting the sending DateTime parameter using the ISO format |
Legancy Response
|
Key |
Value |
|---|---|
|
Status |
Sent |
|
ID |
Response_Id |
|
Error_Code |
0 |
|
Error_Desc |
0 |
{
    "Result": "Success",
    "Datainfo":
    [
        {
            "Status": "Sent",
            "ID": "Response_Id",
            "Error_Code": "0",
            "Error_Desc": "0"
        }
    ]
}
|
Http Error Code |
Error Code |
Error Description |
Note |
|---|---|---|---|
|
400 |
10 |
Invalid From Parameter (Alphabet Max 11 Digit) |
|
|
400 |
10 |
Invalid From Parameter |
|
|
400 |
11 |
Invalid To Parameter |
|
|
404 |
15 |
Invalid Username/Password |
|
|
200 |
69 |
Insufficient account balance |
|
|
400 |
85 |
Invalid Message Text |
|
|
400 |
97 |
Invalid Sched Parameter (DateTime ISO Format yyyy-MM-ddTHH:mm:ss) |
|
|
400 |
255 |
Unknown Error |
|
|
400 |
260 |
Invalid Dcs Parameter (Text=0 Unicode=8) |
When Dcs param is empty or not included |
|
400 |
260 |
Invalid Dcs Parameter |
|
|
200 |
303 |
Country/Network not available |
|
|
404 |
404 |
Demo Account Expired |
|
|
429 |
429 |
API calls quota exceeded! maximum admitted 1 per 1s/ or according to your SMS plan rate limit. |
|
|
500 |
500 |
Unknown Error |
|
Legancy Code Sample
![]()
![]()
![]()
![]()
![]()
$curl = curl_init();
curl_setopt_array($curl, array(
        CURLOPT_URL => 'https://api.floppy.ai/smslegacy',
        CURLOPT_RETURNTRANSFER => true,
        CURLOPT_ENCODING => '',
        CURLOPT_MAXREDIRS => 10,
        CURLOPT_TIMEOUT => 0,
        CURLOPT_FOLLOWLOCATION => true,
        CURLOPT_HTTP_VERSION => CURL_HTTP_VERSION_1_1,
        CURLOPT_CUSTOMREQUEST => 'POST',
        CURLOPT_POSTFIELDS =>
        'username={your_user_name}&password={your_password}&to={to_number}&from={sender}&dcs={dcs}&text={message_body}',
        CURLOPT_HTTPHEADER => array(
        'Content-Type: application/x-www-form-urlencoded'
        ),
    ));
$response = curl_exec($curl);
curl_close($curl);
echo $response;
require "uri"
require "net/http"
url = URI("https://api.floppy.ai/smslegacy")
https = Net::HTTP.new(url.host, url.port)
https.use_ssl = true
request = Net::HTTP::Post.new(url)
request["Content-Type"] = "application/x-www-form-urlencoded"
request.body =
"username={your_username}&password={your_password}&to={to_number}&from={sender}&dcs={dcs}&text={message_body}"
response = https.request(request)
puts response.read_body
//The OkHttpClient is an external package, you need to install it before making the request,
//And don't forget to add user permission for the internet inside "\MyApplication\app\src\main\AndroidManifest.xml"
//Also, you need to add required dependencies inside "MyApplication\app\build.gradle"

OkHttpClient client = new OkHttpClient().newBuilder()
.build();
MediaType mediaType = MediaType.parse("application/x-www-form-urlencoded");
RequestBody body = RequestBody.create(mediaType,
"username={your_username}&password={your_password}&to={to_number}&from={sender}&dcs={dcs}&text={message_body}");
Request request = new Request.Builder()
.url("https://api.floppy.ai/smslegacy")
.method("POST", body)
.addHeader("Content-Type", "application/x-www-form-urlencoded")
.build();
Response response = client.newCall(request).execute();
var client = new RestClient("https://api.floppy.ai/smslegacy");
client.Timeout = -1;
var request = new RestRequest(Method.POST);
request.AddHeader("Content-Type", "application/x-www-form-urlencoded");
request.AddParameter("username", "{your_username}");
request.AddParameter("password", "{your_password}");
request.AddParameter("to", "{to_number}");
request.AddParameter("from", "{sender}");
request.AddParameter("dcs", "{dcs}");
request.AddParameter("text", "{message_body}");
IRestResponse response = client.Execute(request);
Console.WriteLine(response.Content);
//Make sure to import Axios and install npm packages before doing the request

var axios = require('axios');
var qs = require('qs');
var data = qs.stringify({
'username': 'YOUR-USER-NAME',
'password': 'YOUR-PASSWORD',
'to': 'TO-NUMBER',
'from': 'FROM-SENDER',
'dcs': '0',
'text': 'MESSAGE-BODY',
'sched': 'Time-IsoFormat'
});

var config = {
  method: 'post',
  url: 'https://api.floppy.ai/smslegacy',
  headers: {
    'Content-Type': 'application/x-www-form-urlencoded'
  },
  data : data
};

axios(config)
.then(function (response) {
  console.log(JSON.stringify(response.data));
})
.catch(function (error) {
  console.log(error);
});
SMPP Overview
- Sending outbound MT messages
- Receiving MT delivery receipts
- Receiving inbound MO messages
account dashboard >> Whitelist settings, once you done with the above, you may contact FloppySend support team or your account manager to whitelisted your SMPP IP at our internal firewall.
- BIND_TRANSMITTER
- BIND_TRANSMITTER_RESP
- BIND_RECEIVER
- BIND_RECEIVER_RESP
- BIND_TRANSCEIVER
- BIND_TRANSCEIVER_RESP
- UNBIND
- UNBIND_RESP
- GENERIC_NACK
- SUBMIT_SM
- SUBMIT_SM_RESP
- DELIVER_SM
- DELIVER_SM_RESP
- ENQUIRE_LINK
- ENQUIRE_LINK_RESP
|
Configuration Setting |
Values |
How to use |
|---|---|---|
|
SMSC Host |
smpp.floppy.ai |
This is the host to use when establishing SMPP binds to FloppySend. Always use the fully qualified domain name. Your service should honor the time-to-live specified in the DNS resolution for the fully qualified domain name. FloppySend supports transmitter, receiver, and transceiver binds. |
|
SMSC Port |
9000: Normal socket, not encrypted. |
9000
is the host port to use when establishing none secure SMPP to FloppySend. |
|
SMPP Version |
3.4 |
This is the interface_version value to use in the SMPP BIND PDU operation. Use SMPP version 3.4. |
|
System ID |
Your FloppySend SMPP account ID. |
This is the system id value to use in the SMPP BIND PDU operation. Use your FloppySend SMPP account ID(Username). |
|
Password |
The valid password for your SMPP account. |
This is the password value to use in the SMPP BIND PDU operation. A maximum of twelve characters is allowed. Use the valid password for your FloppySend SMPP account. |
|
System Type |
Not required for the SMPP BIND PDU operation. |
|
|
Address Range |
Not required SMPP BIND PDU operation. |
|
|
Character set used for all MOs and for MTs where the Data Coding Scheme is set to zero (DCS 0) |
Choose a default of either:
|
This determines the character set used for all SMPP deliver PDUs. FloppySend also assumes that this is the character set of your submit PDUs unless the request specifies a different character set or encoding. For more information, see Data Coding Scheme. |
|
Number of allowed concurrent sessions |
2 (default) |
The total number of concurrent SMPP binds allowed for your account. This value is tailored to your account, based on your use cases and agreement with FloppySend. |
|
Throttle Rate |
10 (default) |
The maximum number of MT submits you can send per second. This value is tailored to your account, based on your use cases and agreement with FloppySend. For more information, see Throttle rate below. |
|
Connection Timeout |
30000 milliseconds (30 seconds) |
FloppySend recommends your system sends ENQUIRE_LINK PDUs every 20 seconds if your application is not actively submitting messages. |
The FloppySend Service Level Agreement (SLA) may restrict the number of messages you can submit based on the maximum allowed message submits per second for your account.
This is known as transaction throttling. If the permitted limit is reached, FloppySend may reject subsequent transactions with SMPP error 0x058 (throttle rate exceeded).
The default throttle rate is stated in your contract, For questions regarding your configured throttle rate, or to request a modification to your contractual limit, contact FloppySend support team.
After you establish a connection and acknowledge an authenticated bind request, you can send additional requests or responses. A response is issued for each request. The network connection into the SMSC ends when the idle connection time, in milliseconds (ms), is exceeded.
Idle time is when no SMPP commands are sent or received across an open network connection within the connection timeout period. The connection is dropped as a result, and you must re-establish it. To avoid this situation, have your external short messaging entity (EMSE) issue an enquire_link operation across the appropriate virtual connection to keep the connection alive.
You can set the enquire_link operation over both the bind_transmitter and bind_receiver sessions. Your application should send the enquire_link before the connection timeout occurs.
FloppySend expects to receive an enquire_link operation on each of your SMPP sessions at least once every 30 seconds and will terminate the SMPP session if this operation is not received within that period. To avoid bind termination as a result of connection timeout, FloppySend recommends that your SMPP sessions trigger an enquire_link operation every 20000 milliseconds.
You can bind the maximum concurrent number of sessions at any given time. The default setting for a SMPP account is to have a maximum of two (2) concurrent sessions. This means you will be able to have either two transceiver-type binds, two pairs of a receiver and transmitter-type binds, or a combination of the two.
To increase the maximum number of concurrent SMPP sessions allowed for your account, contact FloppySend support team.
FloppySend can, on your behalf, retry MTs that fail with retryable error conditions. Automatic retry applies to MTs that fail with retryable error conditions after the MT is accepted by FloppySend and a ticket ID is returned to your system. We can retry MTs for up to 24 hours or until the MT validity period expires, whichever comes first. FloppySend returns a delivery receipt, if requested, after the maximum number of retries has been exhausted.
If you submit an MT with a carrier ID and the MT is rejected by the carrier with an invalid destination address error, FloppySend will perform a carrier lookup to determine if a different carrier ID should be used to route the MT. If a different carrier ID for the destination address is found, FloppySend will submit the MT to the new carrier and your account will be charged for the lookup.
Integrating with SMPP
Short Message Peer-to-Peer (SMPP) is an industry-standard protocol for exchanging short messages and data between systems.
SMPP defines operation and protocol data units (PDUs), where every operation has a request PDU and an associated response PDU. The only exception is for alert notifications, which do not require an associated response PDU. The receiving entity must send the associated response to the SMPP PDU request.
FloppySend supports version 3.4 of the SMPP protocol.
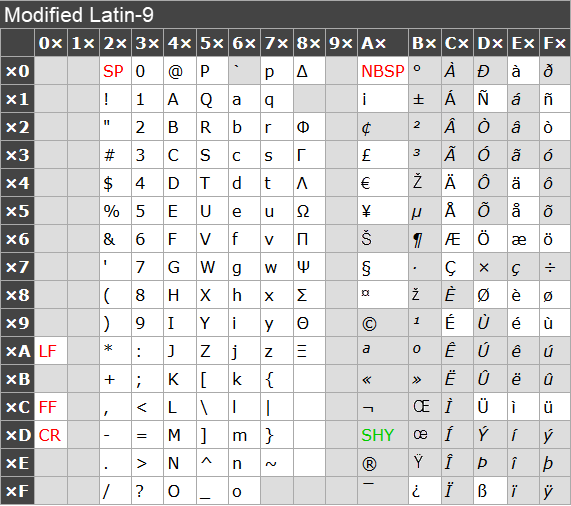
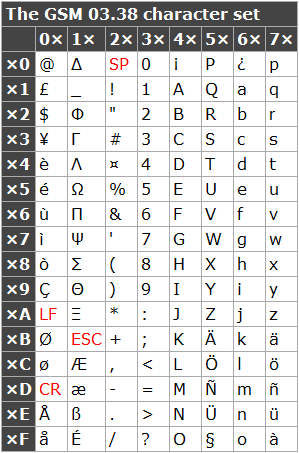
Data Coding Scheme
In SMPP, the data coding scheme (DCS) indicates information that includes (but isn't restricted to) the character set that the message text is in.
When your account is first provisioned, we set a default character encoding on your account for both sending and receiving messages. When sending messages, use DCS 0 to indicate that the message text uses your default character encoding.
You can choose either of these two character sets as the default for your account:
-
Latin 1 (ISO-8859-1). A table of characters is below.
-
GSM 7-bit default alphabet and extension table of 3GPP TS 23.038 / GSM 03.38 A table of characters is below.
Other DCS options include:
-
DCS 4 — Binary message
-
DCS 8 — UTF-16 big-endian encoding. See the Wikipedia article: UTF-16
-
DCS 240 — Flash (class 0) message. The message text must use the default character set configured for your account.
-
DCS 24 — Flash (class 0) message, where the message text uses UCS-2.
-
DCS 246 — SIM-specific binary message. This is only used in special cases where you are communicating with a custom application on the mobile device. No message reaches the phone's SMS inbox.
The characters not present in the GSM character set are shown on a grey background.
The acronyms in the table are:
-
LF — line feed
-
FF — form feed
-
CR — carriage return
-
SP — space
-
NBSP — non-breaking space
-
SHY — soft hyphen
See the Wikipedia article for more information: Latin-1.
See the Wikipedia article for more information: GSM 03.38.
Delivery Receipt Codes
Search for a code or on any other text:
|
Status Code |
Status Description |
Description |
|---|---|---|
|
0 |
Message sent |
FloppySend successfully sent the message to the mobile operator. In some situations, the mobile operator will not return any further update than this receipt (e.g., for a message sent using a landline, or supplementary numbers). If this is your final delivery receipt, treat this as a "successful" delivery. |
|
1 |
Failed message delivery |
The mobile operator accepted the message but has informed us that the
message delivery failed. They do not want retries of the same message.
|
|
2 |
Message delivered |
The mobile operator successfully delivered the message to the end-user. |
|
5 |
Failed message delivery |
The mobile operator accepted the message but has informed us that
the message delivery failed. They do not want retries of the
same message.
|
|
888 |
Message failed Value of mobileOperatorID does not exist |
Your request specified a value for mobileOperatorId that is
not one of the pre-defined IDs.
|
SMPP Error Codes
These error codes are returned with submit_sms_resp PDUs.
They indicate either an issue with
the format or structure of your request, or an issue with delivery to the mobile phone.
Search for a code or on any other text:
|
Hex Value |
Decimal |
Description |
Possible Solution |
|---|---|---|---|
|
0x000000C5-0x000000FD |
|||
|
0x00000000 |
0 |
No Error |
|
|
0x00000001 |
1 |
Message length is invalid |
Max 140 octets; 160 chars in uncompressed default character encoding. |
|
0x00000002 |
2 |
Command length is invalid |
|
|
0x00000003 |
3 |
Invalid Command ID |
|
|
0x00000004 |
4 |
Incorrect BIND Status for given command |
You must bind first before any other request is handled. |
|
0x00000005 |
5 |
ESME Already in Bound State |
Do not send bind requests when already bound. |
|
0x00000006 |
6 |
Invalid Priority Flag |
|
|
0x00000007 |
7 |
Invalid Registered Delivery Flag |
|
|
0x00000008 |
8 |
System Error |
|
|
0x00000009 |
Reserved |
||
|
0x0000000A |
10 |
Invalid Source Address |
|
|
0x0000000B |
11 |
Invalid Dest Addr |
Invalid length; the length was greater than 3 && less than 17, invalid international format. |
|
0x0000000C |
12 |
Message ID is invalid |
|
|
0x0000000D |
13 |
Bind Failed |
|
|
0x0000000E |
14 |
Invalid Password |
|
|
0x0000000F |
15 |
Invalid System ID |
|
|
0x00000010 |
16 |
Reserved |
|
|
0x00000011 |
17 |
Cancel SM Failed |
|
|
0x00000012 |
Reserved |
||
|
0x00000013 |
19 |
Replace SM Failed |
|
|
0x00000014 |
20 |
Message Queue Full |
|
|
0x00000015 |
21 |
Invalid Service Type |
Set to NULL |
|
0x00000016 |
Reserved thru -0x00000032 |
||
|
0x00000033 |
51 |
Invalid number of destinations |
|
|
0x00000034 |
52 |
Invalid Distribution List name |
|
|
0x00000035 |
53 |
Reserved thru -0x0000003F |
|
|
0x00000040 |
64 |
Destination flag is invalid (submit_multi) |
|
|
0x00000041 |
Reserved |
||
|
0x00000042 |
66 |
Invalid submit with replace request; submit_sm with replace_if_present_flag set |
|
|
0x00000043 |
67 |
Invalid esm_class field data |
|
|
0x00000044 |
68 |
Cannot Submit to Distribution List |
|
|
0x00000045 |
69 |
submit_sm or submit_multi failed |
|
|
0x00000046 |
Reserved thru -0x00000047 |
||
|
0x00000048 |
72 |
Invalid Source address TON |
Accepts International, Network, or Alphanumeric; values of 0x01, 0x03, and 0x05. |
|
0x00000049 |
73 |
Invalid Source address NPI |
Set to null for default value or 0x01 for ISDN numbering plan indicator. |
|
0x00000050 |
80 |
Invalid Destination address TON |
Accepts either Unknown Or International; values: 0x00 and 0x01 |
|
0x00000051 |
81 |
Invalid Destination address NPI |
Accepts either Unknown Or ISDN E163/E164: values: 0x00 and 0x01. |
|
0x00000052 |
Reserved |
||
|
0x00000053 |
83 |
Invalid system_type field |
|
|
0x00000054 |
84 |
Invalid replace_if_present flag. |
|
|
0x00000055 |
85 |
Invalid number of messages |
|
|
0x00000056 |
Reserved thru -0x00000057 |
||
|
0x00000058 |
88 |
Throttling error; ESME has exceeded allowed message limits. |
|
|
0x00000059 |
89 |
Reserved thru -0x00000060 |
|
|
0x00000061 |
97 |
Invalid Scheduled Delivery Time |
|
|
0x00000062 |
98 |
Invalid message validity period (Expiry time). |
|
|
0x00000063 |
99 |
Predefined Message Invalid or Not Found |
Does not support canned messages; set to NULL. |
|
0x00000064 |
100 |
ESME Receiver Temporary App Error Code |
|
|
0x00000065 |
101 |
ESME Receiver Permanent App Error Code |
|
|
0x00000066 |
102 |
ESME Receiver Reject Message Error Code |
|
|
0x00000067 |
103 |
query_sm request failed |
|
|
0x00000068 |
104 |
Reserved thru -0x000000BF |
|
|
0x000000C0 |
192 |
Error in the optional part of the PDU Body |
|
|
0x000000C1 |
193 |
Optional Parameter not allowed |
|
|
0x000000C2 |
194 |
Invalid Parameter Length |
|
|
0x000000C3 |
195 |
Expected Optional Parameter missing. |
|
|
0x000000C4 |
196 |
Invalid Optional Parameter Value |
This error occurs when an optional value parameter retrieve fails; this not normal behavior. |
|
0x000000FE |
245 |
Delivery Failure, used for data_sm_resp |
|
|
0x000000FF |
255 |
Unknown Error |
|
|
0x00000100 |
Reserved for SMPP extension thru -0x000003FF |
||
|
0x0000012F |
303 |
Country/Network not available |
API Rate Limiting
The default request rate limit is 30 requests per second per account, each SMS plan ( Silver, Golden, VIP ) have a different rate limit ( 30, 60, 100 ) ( 30, 60, 100 ), ( can be adjusted upon request ) with a special Restapi endpoint, and can reach up to 150 requests ( Custom Plan ) per second per IP address.
The API will reject all requests exceeding this rate limit with 429 Too Many Requests HTTP Status.
The same rules are also applied on SMPP connection protocol, at SMPP rate limit can reach up to 300 to 500 SMS per sec, can be adjusted upon request.
You can retry the request after 1 second.
Email to SMS
Whitelisting Emails
To whitelist emails and domains go to “Settings” “Whitelist”, add an email like [email protected] or an entire domain e.g. *@example.com if your whole organization should be able to send messages this way, make sure you are using a valid and live domain or email address.
If you whitelist *@example.com no other accounts will be able to use this domain, this is for security reasons and our customer protections, we not allowed any free domains such as @gmail.com, @outlook.com, etc., after you add your email/domain, kindly inform our support team to whitelisted also at our system firewall.
Requirements
To successfully deliver your email as an SMS you have to verify that you are the owner of this domain for proper authentication:
Your whitelisted emails or domain, need to pass domain TXT check.
Once you add your email/domain you will get an email with the TXT name and value, which you have to add to your domain DNS records, once you add that, our system will do the verification and check the record, if it's passed then you are ready to use the service.
Sending An SMS
Sending an Email to SMS is straightforward, all you need to do is send to the phone number of your recipient and write your email text body (SMS Text).
Sending SMS messages is a simple as sending an email to the: [email protected]
For Example:
Your sender ID is controlled by the default email from name at your email settings found under “POP Account Settings”, “Your Name”, make sure (from name), not more than 11 Char, for email 2 SMS, SMS sender name length limited to 11 Char.
You may set a default sender ID at the default settings found under “Settings”, “SMS defaults”, at your account dashboard, this will overwrite your from-name parameter while you sending email to SMS.
SMSes send on this service are limited to 1 SMS part, equal to 160 characters, and only accepting text type English char. this is a measure to try and prevent unintentionally long SMSes send when using email clients like e.g. Gmail, where the mails are kept as conversation threads SMSes send on this service are limited to 1 SMS part, equal to 160 characters, and only accepting text type English char.
This is a measure to try and prevent unintentionally long SMSes send when using email clients like e.g. Gmail, where the mails are kept as conversation threads.
After you sent your email, you may check your SMS account sent log to check the sent status for each number.
The system will check the received emails and send it as SMS messages in each 1 min interval, so when you sent your email, your message could take 1 min +/- to appear in your sent log.
Webhook
Webhooks are "user-defined HTTP callbacks". They are usually triggered by some event, such as receiving, failure or rejected messages.
When that event occurs, FloppySend makes an HTTP Post request to the URL configured for the webhook. Users can configure them at account dashboard >> Webhooks section.
Inbound SMS Webhook
The Webhook for Inbound SMS is used to programmatically sent any inbound SMS received on a virtual number,
to the configured Webhook URL at your account, you may set different inbound webhook for each virtual
number, or you can set a default one at your account settings page >> Webhook section.
Example below:
{
    "from":"{sender_name}",
    "to":"{to_number}",
    "status":"{message_status}",
    "date":"{sending_date}",
    "id":"{message_id}",
}
Outbound SMS Webhook
Delivery Receipts (DR) are webhooks for delivery statuses: POST method sent by FloppySend in Text/Plain format to the Delivery Receipts URL configured at your account under Webhooks section.
Whenever a message has a new delivery, undelivered, rejected, expired status associated with the delivery stage it is in, FloppySend sends out a POST request with the new status to the callback URL.
Retry policy:
In case of connection error/timeout or HTTP response code 4XX or 5XX, FloppySend will do a
retry attempts with intervals: 1, 10, 300, 900 sec.
"msg_from"={sender_number}&
"msg_text"={message_body}&
"received_date"={receiveing_date}&
"msg_to"={to_number}&
"type"={message_type}&
"sms_parts"={sms_parts}&
"sms_rate"={sms_cost}&
"msg_id"={message_id}
Balance
Get your current balance for FloppySend Services with simple API
Balance Parameters
GET, POST methods
https://api.floppy.ai/balanceNote:
Due to data protection reasons the API is only accessible via HTTPs with TLS versions 1.0, 1.1 or 1.2.
You can get your X-Api-Key And X-Secret-Hash
from your
account setting page in Api Keys section
{
    X-api-key:"Your x-api-key" (string required)
    X-Secret-Hash:"Your x-secret-hash"
    (string required if added from dashboard)
}
Balance Response
|
Key |
Value |
|---|---|
|
Status |
Sent |
|
Balance |
Your Balance |
|
Currency |
Balance currency |
{
    "Result": "Success",
    "Datainfo": [
        {
            "Balance": "{your_balance}",
            "Currency": "{balance_currency}"
        }
    ]
}
|
Http Error Code |
Error Code |
Error Description |
|---|---|---|
|
403 |
403 |
Api Key Not Found! |
|
403 |
403 |
Invalid secret Hash! |
|
404 |
404 |
Missing Secret Hash From Header |
|
404 |
404 |
Missing Api Key From Header |
|
429 |
429 |
API calls quota exceeded! maximum admitted 1 per 5m. |
|
500 |
500 |
Unknown Error |
X-Secret-Hash
then you can use this MD5 value in the API request at the header of X-Secret-Hash
-
Create a signed request to check the balance.
-
Check the response codes and ensure that you sent the request correctly.
Balance Code Sample
Note:
you need to add your "X-Secret-Hash" in the header if you have one.
![]()
![]()
![]()
![]()
![]()
$curl = curl_init();
curl_setopt_array($curl, array(
        CURLOPT_URL => 'https://api.floppy.ai/balance',
        CURLOPT_RETURNTRANSFER => true,
        CURLOPT_ENCODING => '',
        CURLOPT_MAXREDIRS => 10,
        CURLOPT_TIMEOUT => 0,
        CURLOPT_FOLLOWLOCATION => true,
        CURLOPT_HTTP_VERSION => CURL_HTTP_VERSION_1_1,
        CURLOPT_CUSTOMREQUEST => 'POST',
        CURLOPT_HTTPHEADER => array(
        'x-api-key: "Your x-api-key"',
        'Content-Length: 0'
        ),
    ));
$response = curl_exec($curl);
curl_close($curl);
echo $response;
require "uri"
require "net/http"
url = URI("https://api.floppy.ai/balance")
https = Net::HTTP.new(url.host, url.port)
https.use_ssl = true
request = Net::HTTP::Post.new(url)
request["x-api-key"] = "Your x-api-key"
response = https.request(request)
puts response.read_body
//The OkHttpClient is an external package, you need to install it before making the request,
//And don't forget to add user permission for the internet inside "\MyApplication\app\src\main\AndroidManifest.xml"
//Also, you need to add required dependencies inside "MyApplication\app\build.gradle"

OkHttpClient client = new OkHttpClient().newBuilder()
.build();
MediaType mediaType = MediaType.parse("text/plain");
RequestBody body = RequestBody.create(mediaType, "");
Request request = new Request.Builder()
.url("https://api.floppy.ai/balance")
.method("POST", body)
.addHeader("x-api-key", "Your x-api-key")
.build();
Response response = client.newCall(request).execute();
var client = new RestClient("https://api.floppy.ai/balance");
client.Timeout = -1;
var request = new RestRequest(Method.POST);
request.AddHeader("x-api-key", "Your x-api-key");
IRestResponse response = client.Execute(request);
Console.WriteLine(response.Content);te(request);
Console.WriteLine(response.Content);
//Make sure to import Axios and install npm packages before doing the request

var axios = require('axios');

var config = {
  method: 'post',
  url: 'https://api.floppy.ai/balance',
  headers: {
    'x-api-key': 'YOUR-API-KEY'
  }
};

axios(config)
.then(function (response) {
  console.log(JSON.stringify(response.data));
})
.catch(function (error) {
  console.log(error);
});
OTP API Introduction
Integrating with our OTP API is easy. When you use FloppySend’s REST API to integrate SMS capabilities into your application, you’ll save hundreds of hours compared to building OTP functionality from the ground up.
The One-Time-Password (OTP) Interface is used to perform a mobile authentication or to build the second path in a Two-Factor-Authentication (2FA) environment.
With the OTP Interface the Customer can easily submit one time passwords to their end-users and verify their responses without needing to maintain a databas
-
Request a SMS PIN and send it to the Customer’s end-user
-
Verify the PIN that was entered by the end-user
FloppySend offers both API endpoints which you can hit with any language,
as well as a selection of Helper Libraries which help to build complex communications services into products in little time.
To use our OTP API, you need an API key in order to be identified within our system. It is provided to you at registration, and is available from your user profile.
OTP Request API Introduction
A one-time password (OTP), also known as a one-time PIN, one-time authorization code (OTAC) or dynamic password, is a password that is valid for only one login session or transaction.
OTP Request Parameters
-
POST METHOD ONLY:
You need to append params as x-www-form-urlencoded inside the body of the request
https://api.floppy.ai/otp/requestYou can get your X-Api-Key And X-Secret-Hash from your account setting page in Api Keys section
{
    X-api-key:"Your x-api-key" (string required)
    X-Secret-Hash:"Your x-secret-hash"
    (string required if added from dashboard)
}
Note:
Inside the message body text you must insert {pin} as placeholder, which it will be switched
as the otp alphanumeric value when the message is sent to the client.
|
Parameter |
Type |
Required |
Description |
|---|---|---|---|
|
From |
string |
Yes |
|
|
To |
string |
Yes |
|
|
Text |
string |
Yes |
|
|
Pin_type |
origin is set to numeric |
Optional |
only one of these |
|
Pin_length |
origin is set to 4 |
Optional |
only one of these |
|
Max_amount |
origin is set to 3 |
Optional |
only one of these |
OTP Request Response
|
Key |
Value |
|---|---|
|
Status |
Sent |
|
ID |
Response_Id |
|
Error_Code |
0 |
|
Error_Desc |
0 |
{
    "Result": "Success",
    "Datainfo":
    [
        {
            "Status": "Sent",
            "ID": "Response_Id",
            "Error_Code": "0",
            "Error_Desc": "0"
        }
    ]
}
Note:
The OTP expires 10 minutes after it is issued. ...
If your client is not able to confirm the request before the OTP expires,
he can request a new OTP, according to the max retry amount which you
set within your Api request default (3),
any new request will deactivate and mark any previous pending requests
as fail.
|
Http Error Code |
Error Code |
Error Description |
|---|---|---|
|
400 |
1 |
Invalid Message Length(Max 1 Part For OTP) |
|
400 |
10 |
Invalid From Parameter |
|
400 |
10 |
Invalid From Parameter (Alphabet Max 11 Digit) |
|
400 |
11 |
Invalid To Parameter |
|
400 |
69 |
Insufficient account balance |
|
400 |
85 |
Invalid Message Text |
|
400 |
260 |
Invalid Pin Type Value (Only (numeric,alpha,alphanumeric)) |
|
404 |
270 |
Invalid Pin Length Value (Only (4,5,6)) |
|
400 |
290 |
Invalid Max Amount Value (Only (3,4,5)) |
|
400 |
300 |
Reached User Limits |
|
400 |
310 |
Pin Place Holder {pin} Missing In Message Text |
|
403 |
403 |
Api Key Not Found! |
|
403 |
403 |
Invalid secret Hash! |
|
404 |
404 |
Missing Api Key From Header |
|
404 |
404 |
Missing Secret Hash From Header |
|
429 |
429 |
API calls quota exceeded! maximum admitted 1 per 1s/ or according to your SMS plan rate limit. |
|
500 |
500 |
Unknown Error |
X-Secret-Hash
then you can use this MD5 value in the API request at the header of X-Secret-Hash
-
Create a signed request to send OTP request.
-
Check the response codes and ensure that you sent the request correctly.
OTP Request Code Sample
Note: you need to add your "X-Secret-Hash" in the header if you have one.
![]()
![]()
![]()
![]()
![]()
$curl = curl_init();
curl_setopt_array($curl, array(
        CURLOPT_URL => 'https://api.floppy.ai/otp/request',
        CURLOPT_RETURNTRANSFER => true,
        CURLOPT_ENCODING => '',
        CURLOPT_MAXREDIRS => 10,
        CURLOPT_TIMEOUT => 0,
        CURLOPT_FOLLOWLOCATION => true,
        CURLOPT_HTTP_VERSION => CURL_HTTP_VERSION_1_1,
        CURLOPT_CUSTOMREQUEST => 'POST',
        CURLOPT_POSTFIELDS =>
        'from={sender}&to={to_number}&text={message_body}%20%7Bpin%7D&pin_type=alphanumeric&pin_len
        gth=4&max_amount=3',
        CURLOPT_HTTPHEADER => array(
        'x-api-key: "Your x-api-key"',
        'Content-Type: application/x-www-form-urlencoded'
        ),
    ));
$response = curl_exec($curl);
curl_close($curl);
echo $response;
require "uri"
require "net/http"
url = URI("https://api.floppy.ai/otp/request")
https = Net::HTTP.new(url.host, url.port)
https.use_ssl = true
request = Net::HTTP::Post.new(url)
request["x-api-key"] = "Your x-api-key"
request["Content-Type"] = "application/x-www-form-urlencoded"
request.body =
"from={sender}&to={to_number}&text={message_body}%20%7Bpin%7D&pin_type=alphanumeric&pin_len
gth=4&max_amount=3"
response = https.request(request)
puts response.read_body
//The OkHttpClient is an external package, you need to install it before making the request,
//And don't forget to add user permission for the internet inside "\MyApplication\app\src\main\AndroidManifest.xml"
//Also, you need to add required dependencies inside "MyApplication\app\build.gradle"

OkHttpClient client = new OkHttpClient().newBuilder()
.build();
MediaType mediaType = MediaType.parse("application/x-www-form-urlencoded");
RequestBody body = RequestBody.create(mediaType,
"from={sender}&to={to_number}&text={message_body}
{pin}&pin_type=alphanumeric&pin_length=4&max_amount=3");
Request request = new Request.Builder()
.url("https://api.floppy.ai/otp/request")
.method("POST", body)
.addHeader("x-api-key", "Your x-api-key")
.addHeader("Content-Type", "application/x-www-form-urlencoded")
.build();
Response response = client.newCall(request).execute();
var client = new RestClient("https://api.floppy.ai/otp/request");
client.Timeout = -1;
var request = new RestRequest(Method.POST);
request.AddHeader("x-api-key", "Your x-api-key");
request.AddHeader("Content-Type", "application/x-www-form-urlencoded");
request.AddParameter("from", "{sender}");
request.AddParameter("to", "{to_number}");
request.AddParameter("text", "{message_body} {pin}");
request.AddParameter("pin_type", "alphanumeric");
request.AddParameter("pin_length", "4");
request.AddParameter("max_amount", "3");
IRestResponse response = client.Execute(request);
Console.WriteLine(response.Content);
//Make sure to import Axios and install npm packages before doing the request

var axios = require('axios');
var qs = require('qs');
var data = qs.stringify({
    'from': 'SENDER',
    'to': 'NUMBER',
    'text': 'SAMPLE-TEXT{pin}',
    'pin_type': 'alphanumeric',
    'pin_length': '4',
    'max_amount': '4'
});
var config = {
    method: 'post',
    url: 'https://api.floppy.ai/otp/request',
    headers: {
        'x-api-key': 'YOUR-API-KEY',
        'Content-Type': 'application/x-www-form-urlencoded'
    },
    data: data
};

axios(config)
    .then(function (response) {
        console.log(JSON.stringify(response.data));
    })
    .catch(function (error) {
        console.log(error);
    });
OTP Request API Introduction
A one-time password (OTP), also known as a one-time PIN, one-time authorization code (OTAC) or dynamic password, is a password that is valid for only one login session or transaction.
OTP Response Parameters
-
POST METHOD ONLY:
You need to append params as x-www-form-urlencoded inside the body of the request
https://api.floppy.ai/otp/validateYou can get your X-Api-Key And X-Secret-Hash from your account setting page in Api Keys section
{
    X-api-key:"Your x-api-key" (string required)
    X-Secret-Hash:"Your x-secret-hash"
    (string required if added from dashboard)
}
|
Parameter |
Type |
Required |
|---|---|---|
|
Pin |
string |
Yes |
|
Id |
string |
Yes |
OTP Response Response
|
Key |
Value |
|---|---|
|
Status |
Valid |
|
ID |
Response_Id |
|
Error_Code |
0 |
|
Error_Desc |
0 |
{
    "Result": "Success",
    "Datainfo":
    [
        {
            "Status": "Valid",
            "ID": "Response_Id",
            "Error_Code": "0",
            "Error_Desc": "0"
        }
    ]
}
|
Value |
Description |
|---|---|
|
Pending |
Means the OTP request SMS has been sent and your client has not yet made any OTP verification to this OTP id |
|
Success |
Means the OTP request SMS has been verified successfully. |
|
Fail |
Means the OTP request SMS can't be verified from your client side. |
|
Expire |
Means the OTP request SMS can't be verified from your client-side within the OTP expire time default (10 min) |
|
Http Error Code |
Error Code |
Error Description |
Note |
|---|---|---|---|
|
400 |
100 |
Invalid Request ID |
Id is wrong |
|
400 |
103 |
Invalid Request ID |
If id is invalid
|
|
400 |
110 |
Invalid Pin |
If pin is invalid
|
|
400 |
300 |
Reached Validation Limits |
|
|
403 |
403 |
Invalid secret Hash! |
|
|
404 |
404 |
Missing Api Key From Header |
|
|
429 |
429 |
API calls quota exceeded! maximum admitted 1 per 1s/ or according to your SMS plan rate limit. |
|
|
500 |
500 |
Unknown Error |
|
X-Secret-Hash
then you can use this MD5 value in the API request at the header of X-Secret-Hash
-
Create a signed request to send OTP response.
-
Check the response codes and ensure that you sent the request correctly.
OTP Response Code Sample
Note:
you need to add your "X-Secret-Hash" in the header if you have one.
![]()
![]()
![]()
![]()
![]()
$curl = curl_init();
curl_setopt_array($curl, array(
        CURLOPT_URL => 'https://api.floppy.ai/otp/validate',
        CURLOPT_RETURNTRANSFER => true,
        CURLOPT_ENCODING => '',
        CURLOPT_MAXREDIRS => 10,
        CURLOPT_TIMEOUT => 0,
        CURLOPT_FOLLOWLOCATION => true,
        CURLOPT_HTTP_VERSION => CURL_HTTP_VERSION_1_1,
        CURLOPT_CUSTOMREQUEST => 'POST',
        CURLOPT_POSTFIELDS => 'pin={pin}&id={id}',
        CURLOPT_HTTPHEADER => array(
        'x-api-key: "Your x-api-key"',
        'Content-Type: application/x-www-form-urlencoded'
        ),
    ));
$response = curl_exec($curl);
curl_close($curl);
echo $response;
require "uri"
require "net/http"
url = URI("https://api.floppy.ai/otp/validate")
https = Net::HTTP.new(url.host, url.port)
https.use_ssl = true
request = Net::HTTP::Post.new(url)
request["x-api-key"] = "Your x-api-key"
request["Content-Type"] = "application/x-www-form-urlencoded"
request.body = "pin={pin}&id={id}"
response = https.request(request)
puts response.read_body
//The OkHttpClient is an external package, you need to install it before making the request,
//And don't forget to add user permission for the internet inside "\MyApplication\app\src\main\AndroidManifest.xml"
//Also, you need to add required dependencies inside "MyApplication\app\build.gradle"

OkHttpClient client = new OkHttpClient().newBuilder()
.build();
MediaType mediaType = MediaType.parse("application/x-www-form-urlencoded");
RequestBody body = RequestBody.create(mediaType,
"pin={pin}&id={id}");
Request request = new Request.Builder()
.url("https://api.floppy.ai/otp/validate")
.method("POST", body)
.addHeader("x-api-key", "Your x-api-key")
.addHeader("Content-Type", "application/x-www-form-urlencoded")
.build();
Response response = client.newCall(request).execute();
var client = new RestClient("https://api.floppy.ai/otp/validate");
client.Timeout = -1;
var request = new RestRequest(Method.POST);
request.AddHeader("x-api-key", "Your x-api-key");
request.AddHeader("Content-Type", "application/x-www-form-urlencoded");
request.AddParameter("pin", "{pin}");
request.AddParameter("id", "{id}");
IRestResponse response = client.Execute(request);
Console.WriteLine(response.Content);
//Make sure to import Axios and install npm packages before doing the request

var axios = require('axios');
var qs = require('qs');
var data = qs.stringify({
    'pin': 'PIN-FROM-SMS',
    'id': 'SMS-ID-FROM-OTPREQUEST'
});
var config = {
    method: 'post',
    url: 'https://api.floppy.ai/otp/validate',
    headers: {
        'x-api-key': 'YOUR-API-KEY',
        'Content-Type': 'application/x-www-form-urlencoded'
    },
    data: data
};

axios(config)
    .then(function (response) {
        console.log(JSON.stringify(response.data));
    })
    .catch(function (error) {
        console.log(error);
    });
HLR API Introduction
FloppySend’s HLR API provides a way to send Network Queries to any mobile number globally. It allows you to view what mobile number (MSISDN) belongs to what operator in real-time and see if the number is active.
The HLR API uses HTTP RESTful endpoint structure with an access key that is used as the API Authorization framework. Response payloads are formatted as JSON.
HLR Parameters
-
GET: If the request is get method you need to append params as query string inside the params section
-
POST: If request is post method you need to append params as x-www-form-urlencoded inside the body of the request
https://api.floppy.ai/hlrYou can get your X-Api-Key And X-Secret-Hash from your account setting page in Api Keys section
{
    X-api-key:"Your x-api-key" (string required)
    X-Secret-Hash:"Your x-secret-hash"
    (string required if added from dashboard)
}
|
Parameter |
Type |
Required |
Description |
|---|---|---|---|
|
Msisdn |
string |
Yes |
number sending to |
HLR Response
|
Key |
Value |
|---|---|
|
Number |
Phone number |
|
Country |
Number Country |
|
Network |
Number Network |
|
Operator |
Number operator |
|
Type |
Number Device |
|
ErrorText |
Error Text |
|
ErrorCode |
Error Code |
|
Status |
Number Status |
|
MccMnc |
Mcc, Mnc |
|
IsPorted |
True or false |
|
IsRoaming |
True or false |
|
Date |
Checing date |
|
Cost |
Checking cost |
{
    "Result": "Success",
    "Datainfo": [
        {
            "Number": "{phone_number}",
            "Country": "{phone_number_country}",
            "Network": "{phone_number_network}",
            "Operator": "{phone_number_operator}",
            "Type": "{phone_type}",
            "ErrorText": "{error_text}",
            "ErrorCode": "{error_code}",
            "Status": "{status}",
            "MccMnc": "{MccMnc}",
            "IsPorted": "{true_or-false}",
            "IsRoaming": "{true_or-false}",
            "Date": "{checing_date}",
            "Cost": "{checking_cost}"
        }
    ]
}
|
Http Error Code |
Error Code |
Error Description |
Note |
|---|---|---|---|
|
400 |
001 |
Invalid Msisdn |
Empty or invalid param |
|
400 |
003 |
Insufficient account balance |
|
|
400 |
400 |
Missing Parameters |
If Msisdn is invalid |
|
403 |
403 |
Api Key Not Found! |
Incorrect api key |
|
403 |
403 |
Invalid secret Hash! |
Incorrect hash |
|
404 |
404 |
Missing Api Key From Header |
Missing api key |
|
404 |
404 |
Missing Secret Hash From Header |
Missing hash |
|
404 |
404 |
Demo Account Expired |
|
|
429 |
429 |
API calls quota exceeded! maximum admitted 1 per 1s/ or according to your SMS plan rate limit. |
|
|
500 |
500 |
Unknown Error |
|
Status Information
|
ERROR_CODE |
ERROR_TEXT |
Status |
Description |
Charges? |
|---|---|---|---|---|
|
0 |
Live |
Delivered |
Active mobile number |
Yes |
|
1 |
Dead |
Undelivered |
Number decommissioned by the owning network |
Yes |
|
5 |
Inconclusive |
Undelivered |
We are unable to retrieve a response from the network for this number |
Yes |
|
11 |
No Teleservice Provisioned |
Undelivered |
This number is not able to receive calls or SMS messages. This is usually a number relating to a data SIM |
Yes |
|
27 |
Absent Subscriber |
Undelivered |
There are a number of ways a number can be returned as Absent Subscriber Please see our Absent Subscriber information page for further details. |
Yes |
|
999 |
Number Not Supported |
Undelivered |
There are a number of reasons a number can be returned as "Number Not Supported" please see our Invalid number page for further details |
No |
Invalid Number Response
|
Parameter |
Description |
Format |
|---|---|---|
|
msisdn |
The number used in the request |
String |
|
error_code |
999 |
Integer |
|
error_text |
Number Not Supported |
String |
|
status |
Undelivered |
String |
|
MCCMNC |
null |
Boolean |
|
is_ported |
null |
Boolean |
|
is_roaming |
null |
Boolean |
Note: We do not charge for Rejected numbers.
There are a few possible reasons why your numbers are rejected:
-
The number does not contain a valid country code
-
The number does not contain a valid number range
-
The number is too short or too long
-
A number is a landline number (exception for North America numbers)
We have no coverage for the owning network of the number.
X-Secret-Hash
then you can use this MD5 value in the API request at the header of X-Secret-Hash
-
Create a signed request to send HLR request.
-
Check the response codes and ensure that you sent the request correctly.
HLR Code Sample
Note:
you need to add your "X-Secret-Hash" in the header if you have one.
![]()
![]()
![]()
![]()
![]()
$curl = curl_init();
curl_setopt_array($curl, array(
        CURLOPT_URL => 'https://api.floppy.ai/hlr',
        CURLOPT_RETURNTRANSFER => true,
        CURLOPT_ENCODING => '',
        CURLOPT_MAXREDIRS => 10,
        CURLOPT_TIMEOUT => 0,
        CURLOPT_FOLLOWLOCATION => true,
        CURLOPT_HTTP_VERSION => CURL_HTTP_VERSION_1_1,
        CURLOPT_CUSTOMREQUEST => 'POST',
        CURLOPT_POSTFIELDS => 'Msisdn={phone_number}',
        CURLOPT_HTTPHEADER => array(
        'x-api-key: "Your x-api-key"',
        'Content-Type: application/x-www-form-urlencoded'
        ),
    ));
$response = curl_exec($curl);
curl_close($curl);
echo $response;
require "uri"
require "net/http"
url = URI("https://api.floppy.ai/hlr")
https = Net::HTTP.new(url.host, url.port)
https.use_ssl = true
request = Net::HTTP::Post.new(url)
request["x-api-key"] = "Your x-api-key"
request["Content-Type"] = "application/x-www-form-urlencoded"
request.body = "Msisdn={phone_number}"
response = https.request(request)
puts response.read_body
//The OkHttpClient is an external package, you need to install it before making the request,
//And don't forget to add user permission for the internet inside "\MyApplication\app\src\main\AndroidManifest.xml"
//Also, you need to add required dependencies inside "MyApplication\app\build.gradle"

OkHttpClient client = new OkHttpClient().newBuilder()
.build();
MediaType mediaType = MediaType.parse("application/x-www-form-urlencoded");
RequestBody body = RequestBody.create(mediaType, "Msisdn={phone_number}");
Request request = new Request.Builder()
.url("https://api.floppy.ai/hlr")
.method("POST", body)
.addHeader("x-api-key", "Your x-api-key")
.addHeader("Content-Type", "application/x-www-form-urlencoded")
.build();
Response response = client.newCall(request).execute();
var client = new RestClient("https://api.floppy.ai/hlr");
client.Timeout = -1;
var request = new RestRequest(Method.POST);
request.AddHeader("x-api-key", "Your x-api-key");
request.AddHeader("Content-Type", "application/x-www-form-urlencoded");
request.AddParameter("Msisdn", "{phone_number}");
IRestResponse response = client.Execute(request);
Console.WriteLine(response.Content);
//Make sure to import Axios and install npm packages before doing the request

var axios = require('axios');
var qs = require('qs');
var data = qs.stringify({
    'Msisdn': 'NUMBER'
});
var config = {
    method: 'post',
    url: 'https://api.floppy.ai/hlr',
    headers: {
        'x-api-key': 'YOUR-API-KEY',
        'Content-Type': 'application/x-www-form-urlencoded'
    },
    data: data
};

axios(config)
    .then(function (response) {
        console.log(JSON.stringify(response.data));
    })
    .catch(function (error) {
        console.log(error);
    });
NV API Introduction
FloppySend’s Number Validation offers a full-featured yet simple RESTful JSON API for national and international phone number validation and information lookup for a total of 232 countries around the world.
Integrating the Number Validation API into your application will enable you to verify the validity of phone numbers at the point of entry, protecting you from fraud and increasing good leads.
FloppySend offers both API endpoints which you can hit with any language, as well as a selection of Helper Libraries which help to build complex communications services into products in little time.
NV Parameters
-
GET: If the request is get method you need to append params as query string inside the params section
-
POST: If request is post method you need to append params as x-www-form-urlencoded inside the body of the request
https://api.floppy.ai/numbervalidationYou can get your X-Api-Key And X-Secret-Hash from your account setting page in Api Keys section
{
    X-api-key:"Your x-api-key" (string required)
    X-Secret-Hash:"Your x-secret-hash"
    (string required if added from dashboard)
}
|
Parameter |
Type |
Required |
Description |
|---|---|---|---|
|
Msisdn |
string |
Yes |
number sending to |
NV Response
|
Key |
Value |
|---|---|
|
MSISDN |
Phone Number |
|
Type |
Number device type |
|
Net |
Number network |
|
NetType |
Network internet type |
|
Oop |
Number operoter |
|
HCountry |
Number country |
|
Ciso |
Number country |
|
CC |
CC |
|
MCC |
MCC |
|
MNC |
MNC |
|
Date |
Checking date |
|
Cost |
Checking cost |
{
    "Result": "Success",
    "Datainfo": [
        {
            "MSISDN": "{phone_number}",
            "Type": "{number_device_type}",
            "Net": "{number_network}",
            "NetType": "{network_internet_type}",
            "Oop": "{number_operetor}",
            "HCountry": "{number_country}",
            "Ciso": "{number_country}",
            "CC": "{CC}",
            "MCC": "{MCC}",
            "MNC": "{MNC}",
            "Date": "{cheking_date}",
            "Cost": "{cheking_cost}"
        }
    ]
}
|
Http Error Code |
Error Code |
Error Description |
Note |
|---|---|---|---|
|
400 |
001 |
Invalid Msisdn |
Empty or invalid param |
|
400 |
003 |
Insufficient account balance |
|
|
403 |
403 |
Api Key Not Found! |
Incorrect api key |
|
403 |
403 |
Invalid secret Hash! |
Incorrect hash |
|
404 |
404 |
Missing Parameters |
If Msisdn is invalid |
|
404 |
404 |
Missing Api Key From Header |
Missing api key |
|
404 |
404 |
Missing Secret Hash From Header |
Missing hash |
|
429 |
429 |
API calls quota exceeded! maximum admitted 1 per 1s/ or according to your SMS plan rate limit. |
|
|
500 |
500 |
Unknown Error |
|
X-Secret-Hash
then you can use this MD5 value in the API request at the header of X-Secret-Hash
-
Create a signed request to send Number Validation request.
-
Check the response codes and ensure that you sent the request correctly.
NV Code Sample
Note:
you need to add your "X-Secret-Hash" in the header if you have one.
![]()
![]()
![]()
![]()
![]()
$curl = curl_init();
curl_setopt_array($curl, array(
        CURLOPT_URL => 'https://api.floppy.ai/numbervalidation',
        CURLOPT_RETURNTRANSFER => true,
        CURLOPT_ENCODING => '',
        CURLOPT_MAXREDIRS => 10,
        CURLOPT_TIMEOUT => 0,
        CURLOPT_FOLLOWLOCATION => true,
        CURLOPT_HTTP_VERSION => CURL_HTTP_VERSION_1_1,
        CURLOPT_CUSTOMREQUEST => 'POST',
        CURLOPT_POSTFIELDS => 'Msisdn={phone_number}',
        CURLOPT_HTTPHEADER => array(
        'x-api-key: "Your x-api-key"',
        'Content-Type: application/x-www-form-urlencoded'
        ),
    ));
$response = curl_exec($curl);
curl_close($curl);
echo $response;
require "uri"
require "net/http"
url = URI("https://api.floppy.ai/numbervalidation")
https = Net::HTTP.new(url.host, url.port)
https.use_ssl = true
request = Net::HTTP::Post.new(url)
request["x-api-key"] = "Your x-api-key"
request["Content-Type"] = "application/x-www-form-urlencoded"
request.body = "Msisdn={phone_number}"
response = https.request(request)
puts response.read_body
//The OkHttpClient is an external package, you need to install it before making the request,
//And don't forget to add user permission for the internet inside "\MyApplication\app\src\main\AndroidManifest.xml"
//Also, you need to add required dependencies inside "MyApplication\app\build.gradle"

OkHttpClient client = new OkHttpClient().newBuilder()
.build();
MediaType mediaType = MediaType.parse("application/x-www-form-urlencoded");
RequestBody body = RequestBody.create(mediaType, "Msisdn={phone_number}");
Request request = new Request.Builder()
.url("https://api.floppy.ai/numbervalidation")
.method("POST", body)
.addHeader("x-api-key", "Your x-api-key")
.addHeader("Content-Type", "application/x-www-form-urlencoded")
.build();
Response response = client.newCall(request).execute();
var client = new RestClient("https://api.floppy.ai/numbervalidation");
client.Timeout = -1;
var request = new RestRequest(Method.POST);
request.AddHeader("x-api-key", "Your x-api-key");
request.AddHeader("Content-Type", "application/x-www-form-urlencoded");
request.AddParameter("Msisdn", "{phone_number}");
IRestResponse response = client.Execute(request);
Console.WriteLine(response.Content);
//Make sure to import Axios and install npm packages before doing the request

var axios = require('axios');
var qs = require('qs');
var data = qs.stringify({
 'Msisdn': 'NUMBER'
});
var config = {
  method: 'post',
  url: 'https://api.floppy.ai/numbervalidation',
  headers: {
    'x-api-key': 'YOUR-API-KEY',
    'Content-Type': 'application/x-www-form-urlencoded'
  },
  data : data
};

axios(config)
.then(function (response) {
  console.log(JSON.stringify(response.data));
})
.catch(function (error) {
  console.log(error);
});
Email API Introduction
Floppy Email API is RESTful, fully-featured, and easy to integrate with. You can use HTTP/REST API for your programming language to make HTTP calls.
To use our Email API, you need an API key in order to be identified within our system. It is provided to you at registration.
Note:
Your API token is a request payload token that can be found for change in your API page in your dashboard.
The API token does not change with every request, so make sure to make it safe like your password.
New List
Create a new list with FloppyEmail API, Follow the instructions and ingrate our API with your system or application
Parameters
-
POST METHOD
https://email.floppysend.com/api/v1/listsYou can get your API Token from the integration section in the dashboard
https://email.floppysend.com/api/v1/lists?api_token={your_api_token}
&name={new-list_name}&
from_email={list_from_email}&
from_name={list_from_nam}&
default_subject={list_default_subjet}&
contact[company]={list_contact_company}&
contact[state]={list_contact_state}&
contact[address_1]={list_contact_address_1}&
contact[address_2]={list_contact_address_2}&
contact[city]={list_contact_city}&
contact[zip]={list_contact_zip_code}&
contact[phone]={list_contact_phone}&
contact[country_id]={list_country_id}&
contact[email]={list_contact-email}&
contact[url]={list_contact-website}&
subscribe_confirmation={1_or_0}&
send_welcome_email={1_or_0}&
unsubscribe_notification={1_or_0}
Note:
Due to data protection reasons the API is only accessible via HTTPs with TLS versions 1.0, 1.1 or 1.2.
|
Parameter |
Type |
Required |
Description |
|---|---|---|---|
|
api_token |
string |
Yes |
Your api token |
|
name |
String |
Yes |
New list name |
|
from_email |
string |
Yes |
List from email |
|
from_name |
string |
Yes |
List from name |
|
default_subject |
string |
Optional |
List email subject |
|
contact[company] |
string |
Yes |
List company name |
|
contact[state] |
string |
Yes |
List contact state |
|
contact[address_1] |
string |
Yes |
List contact |
|
contact[address_2] |
string |
Optional |
List contact |
|
contact[city] |
string |
Yes |
List contact |
|
contact[zip] |
string |
Yes |
List contact |
|
contact[phone] |
string |
Optional |
List contact |
|
contact[country_id] |
string |
Yes |
List contact |
|
contact[email] |
string |
Yes |
List contact |
|
contact[url] |
string |
Optional |
List contact |
|
subscribe_confirmation |
string |
Optional |
List subscribe send |
|
send_welcome_email |
string |
Optional |
List send welcome |
|
unsubscribe_notification |
string |
Optional |
List |
Response
|
Key |
Value |
|---|---|
|
Status |
1 or 0 |
|
message |
List was successfully created |
|
list_uid |
60e3c41469 |
{
    "status": 1,
    "message": "List was successfully created",
    "list_uid": "60e3c41469"
}
|
Http Error Code |
Error Key |
Error Description |
Note |
|---|---|---|---|
|
403 |
name |
The name field is required. |
When the list name is missing |
|
403 |
from_email |
The from email field is required. |
When the list from email is missing |
|
403 |
from_name |
The from name field is required. |
When the list from name is missing |
|
403 |
contact.company |
The contact.company field is required. |
When the contact company name is missing |
|
403 |
contact.state |
The contact.state field is required. |
When the contact state is missing |
|
403 |
contact.address_1 |
The contact.address 1 field is required. |
When the contact first address is missing |
|
403 |
contact.city |
The contact.city field is required. |
When the contact city is missing |
|
403 |
contact.zip |
The Zip / Postal code is required. |
When the contact zip code is missing |
|
403 |
contact.country_id |
The contact.country id field is required. |
When the contact country id is missing |
|
403 |
contact.email |
The contact.email field is required. |
When the contact email is missing |
Note:
If api_token was missing you will be redirect to login page
Code Sample
![]()
![]()
![]()
![]()
![]()
$curl = curl_init();

curl_setopt_array($curl, array(
  CURLOPT_URL => 'https://email.floppysend.com/api/v1/lists?api_token={your_api_token}&name={list_name}&from_email={list_from_email}&from_name={list_from_name}&default_subject={list_default_subject}&contact%5Bcompany%5D={list_contact_company}&contact%5Bstate%5D={list_contact_state}&contact%5Baddress_1%5D={list_ontact_address_1}&contact%5Baddress_2%5D={list_contact_address_2}&contact%5Bcity%5D={list_ontact_city}&contact%5Bzip%5D={list_contact_zip_code}&contact%5Bphone%5D={list_contact_phone}&contact%5Bcountry_id%5D={list_contact_country_id}&contact%5Bemail%5D={list_contact_email}&contact%5Burl%5D={list_contact_website}&subscribe_confirmation={1_or_0}&send_welcome_email={1_or_0}&unsubscribe_notification={1_or_0}',
  CURLOPT_RETURNTRANSFER => true,
  CURLOPT_ENCODING => '',
  CURLOPT_MAXREDIRS => 10,
  CURLOPT_TIMEOUT => 0,
  CURLOPT_FOLLOWLOCATION => true,
  CURLOPT_HTTP_VERSION => CURL_HTTP_VERSION_1_1,
  CURLOPT_CUSTOMREQUEST => 'POST',
  CURLOPT_HTTPHEADER => array(
    'Cookie: XSRF-TOKEN={auto_generated}%3D%3D; laravel_session={auto_generated}%3D'
  ),
));

$response = curl_exec($curl);

curl_close($curl);
echo $response;
require "uri"
require "net/http"

url = URI("https://email.floppysend.com/api/v1/lists?api_token={your_api_token}&name={list_name}&from_email={list_from_email}&from_name={list_from_name}&default_subject={list_default_subject}&contact[company]={list_contact_company}&contact[state]={list-contact_state}&contact[address_1]={list_contact_address_1}&contact[address_2]={list_contact_address_2}&contact[city]={list_contact_city}&contact[zip]={list_contact_zip_code}&contact[phone]={list_contact_phone}&contact[country_id]={list_contact_country_id}&contact[email]={list_contact_email}&contact[url]={list_contact_website}&subscribe_confirmation={1_or_0}&send_welcome_email={1_or_0}&unsubscribe_notification={1_or_0}")

https = Net::HTTP.new(url.host, url.port)
https.use_ssl = true

request = Net::HTTP::Post.new(url)
request["Cookie"] = "XSRF-TOKEN={auto_generated}%3D%3D; laravel_session={auto_generated}%3D"

response = https.request(request)
puts response.read_body
//The OkHttpClient is an external package, you need to install it before making the request,
//And don't forget to add user permission for the internet inside "\MyApplication\app\src\main\AndroidManifest.xml"
//Also, you need to add required dependencies inside "MyApplication\app\build.gradle"

OkHttpClient client = new OkHttpClient().newBuilder()
  .build();
MediaType mediaType = MediaType.parse("text/plain");
RequestBody body = RequestBody.create(mediaType, "");
Request request = new Request.Builder()
  .url("https://email.floppysend.com/api/v1/lists?api_token={your_api_token}&name={list_name}&from_email={list_from_email}&from_name={list_from_name}&default_subject={list_default_subject}&contact[company]={list_contact_company}&contact[state]={list-contact_state}&contact[address_1]={list_contact_address_1}&contact[address_2]={list_contact_address_2}&contact[city]={list_contact_city}&contact[zip]={list_contact_zip_code}&contact[phone]={list_contact_phone}&contact[country_id]={list_contact_country_id}&contact[email]={list_contact_email}&contact[url]={list_contact_website}&subscribe_confirmation={1_or_0}&send_welcome_email={1_or_0}&unsubscribe_notification={1_or_0}")
  .method("POST", body)
  .addHeader("Cookie", "XSRF-TOKEN={auto_generated}%3D%3D; laravel_session={auto_generated}%3D")
  .build();
Response response = client.newCall(request).execute();
var client = new RestClient("https://email.floppysend.com/api/v1/lists?api_token={your_api_token}&name={list_name}&from_email={list_from_email}&from_name={list_from_name}&default_subject={list_default_subject}&contact[company]={list_contact_company}&contact[state]={list-contact_state}&contact[address_1]={list_contact_address_1}&contact[address_2]={list_contact_address_2}&contact[city]={list_contact_city}&contact[zip]={list_contact_zip_code}&contact[phone]={list_contact_phone}&contact[country_id]={list_contact_country_id}&contact[email]={list_contact_email}&contact[url]={list_contact_website}&subscribe_confirmation={1_or_0}&send_welcome_email={1_or_0}&unsubscribe_notification={1_or_0}");
client.Timeout = -1;
var request = new RestRequest(Method.POST);
request.AddHeader("Cookie", "XSRF-TOKEN={auto_generated}%3D%3D; laravel_session={auto_generated}%3D");
IRestResponse response = client.Execute(request);
Console.WriteLine(response.Content);
//Make sure to import Axios and install npm packages before doing the request

var axios = require('axios');

var config = {
  method: 'post',
  url: 'https://email.floppysend.com/api/v1/lists?api_token={your_api_token}&name={list_name}&from_email={list_from_email}&from_name={list_from_name}&default_subject={list_default_subject}&contact[company]={list_contact_company}&contact[state]={list-contact_state}&contact[address_1]={list_contact_address_1}&contact[address_2]={list_contact_address_2}&contact[city]={list_contact_city}&contact[zip]={list_contact_zip_code}&contact[phone]={list_contact_phone}&contact[country_id]={list_contact_country_id}&contact[email]={list_contact_email}&contact[url]={list_contact_website}&subscribe_confirmation={1_or_0}&send_welcome_email={1_or_0}&unsubscribe_notification={1_or_0}',
  headers: { }
};

axios(config)
.then(function (response) {
  console.log(JSON.stringify(response.data));
})
.catch(function (error) {
  console.log(error);
});
All Lists
Get all your lists with one click with FloppyEmail API, Follow the instructions and ingrate our API with your system or application
Parameters
-
GET METHOD
https://email.floppysend.com/api/v1/listsYou can get your API Token from the integration section in the dashboard
https://email.floppysend.com/api/v1/lists?api_token={your_api_token}
Note:
Due to data protection reasons the API is only accessible via HTTPs with TLS versions 1.0, 1.1 or 1.2.
|
Parameter |
Type |
Required |
Description |
|---|---|---|---|
|
api_token |
string |
Yes |
Your api token |
Response
|
Key |
Value |
|---|---|
|
id |
list Id |
|
uid |
List uid |
|
name |
List name |
|
default_subject |
List default subject |
|
from_email |
List from email |
|
from_name |
List from name |
|
status |
List status |
|
created_at |
List create date |
|
updated_at |
List last udpate date |
Note:
If api_token was missing you will be redirect to login page
[
    {
        "id": {list_id},
        "uid": "{list_uid}",
        "name": "{list_name}",
        "default_subject": "{list_default_subject}",
        "from_email": "{list_from_email}",
        "from_name": "{list_from_name}",
        "status": null,
        "created_at": "2021-06-23 03:00:06",
        "updated_at": "2021-07-06 03:04:28"
    },
    {
        "id": {list_id},
        "uid": "{list_uid}",
        "name": "{list_name}",
        "default_subject": "{list_default_subject}",
        "from_email": "{list_from_email}",
        "from_name": "{list_from_name}",
        "status": null,
        "created_at": "2021-07-02 06:36:39",
        "updated_at": "2021-07-06 03:04:28"
    }
]
Code Sample
![]()
![]()
![]()
![]()
![]()
$curl = curl_init();

curl_setopt_array($curl, array(
  CURLOPT_URL => 'https://email.floppysend.com/api/v1/lists?api_token={your_api_token}',
  CURLOPT_RETURNTRANSFER => true,
  CURLOPT_ENCODING => '',
  CURLOPT_MAXREDIRS => 10,
  CURLOPT_TIMEOUT => 0,
  CURLOPT_FOLLOWLOCATION => true,
  CURLOPT_HTTP_VERSION => CURL_HTTP_VERSION_1_1,
  CURLOPT_CUSTOMREQUEST => 'GET',
  CURLOPT_HTTPHEADER => array(
    'Cookie: XSRF-TOKEN={auto_generated}%3D%3D; laravel_session={auto_generated}%3D'
  ),
));

$response = curl_exec($curl);

curl_close($curl);
echo $response;
require "uri"
require "net/http"

url = URI("https://email.floppysend.com/api/v1/lists?api_token={your_api_token}")

https = Net::HTTP.new(url.host, url.port)
https.use_ssl = true

request = Net::HTTP::Get.new(url)
request["Cookie"] = "XSRF-TOKEN={auto_generated}%3D%3D; laravel_session={auto_generated}%3D"

response = https.request(request)
puts response.read_body
//The OkHttpClient is an external package, you need to install it before making the request,
//And don't forget to add user permission for the internet inside "\MyApplication\app\src\main\AndroidManifest.xml"
//Also, you need to add required dependencies inside "MyApplication\app\build.gradle"

OkHttpClient client = new OkHttpClient().newBuilder()
  .build();
Request request = new Request.Builder()
  .url("https://email.floppysend.com/api/v1/lists?api_token={your_api_token}")
  .method("GET", null)
  .addHeader("Cookie", "XSRF-TOKEN={auto_generated}%3D%3D; laravel_session={auto_generated}%3D")
  .build();
Response response = client.newCall(request).execute();
var client = new RestClient("https://email.floppysend.com/api/v1/lists?api_token={your_api_token}");
client.Timeout = -1;
var request = new RestRequest(Method.GET);
request.AddHeader("Cookie", "XSRF-TOKEN={auto_generated}%3D%3D; laravel_session={auto_generated}%3D");
IRestResponse response = client.Execute(request);
Console.WriteLine(response.Content);
//Make sure to import Axios and install npm packages before doing the request

var axios = require('axios');

var config = {
  method: 'get',
  url: 'https://email.floppysend.com/api/v1/lists?api_token={your_api_token}',
  headers: { }
};

axios(config)
.then(function (response) {
  console.log(JSON.stringify(response.data));
})
.catch(function (error) {
  console.log(error);
});
Show A Specific List
Grt all specific lists with one click with FloppyEmail API, Follow the instructions and ingrate our API with your system or application
Parameters
-
GET METHOD
https://email.floppysend.com/api/v1/lists/{uid}You can get your API Token from the integration section in the dashboard
https://email.floppysend.com/api/v1/lists/{list_uid}?api_token={your_api_token}
Note:
Due to data protection reasons the API is only accessible via HTTPs with TLS versions 1.0, 1.1 or 1.2.
|
Parameter |
Type |
Required |
Description |
|---|---|---|---|
|
{uid} |
string |
Yes |
List Id |
|
api_token |
string |
Yes |
Your api token |
Response
|
Key |
Value |
|---|---|
|
uid |
List uid |
|
name |
List name |
|
default_subject |
List default subject |
|
from_email |
List from email |
|
from_name |
List from name |
|
remind_message |
Remind Message |
|
status |
List status |
|
created_at |
List create date |
|
updated_at |
List last udpate date |
|
Fields |
List Fields |
|
Contact |
Contat info |
|
Statistics |
List statistics info |
Note:
If api_token was missing you will be redirect to login page
"list": {
        "uid": "{list_uid}",
        "name": "{list_name}",
        "default_subject": "{list_default_subjet}",
        "from_email": "{list_from_email}",
        "from_name": "{list_from_name}",
        "remind_message": null,
        "status": null,
        "created_at": "2021-06-23T03:00:06.000000Z",
        "updated_at": "2021-07-06T03:04:28.000000Z",
        "fields": [
            {
                "key": "EMAIL",
                "label": "Email",
                "type": "string",
                "tag": "EMAIL",
                "default_value": "",
                "visible": "1",
                "required": true,
                "custom_order": "0"
            },
            {
                "key": "FIRST_NAME",
                "label": "First name",
                "type": "string",
                "tag": "FIRST_NAME",
                "default_value": "",
                "visible": "1",
                "required": false,
                "custom_order": "0"
            },
            {
                "key": "LAST_NAME",
                "label": "Last name",
                "type": "string",
                "tag": "LAST_NAME",
                "default_value": "",
                "visible": "1",
                "required": false,
                "custom_order": "0"
            },
            {
                "key": "CUSTOM_FIELD_1",
                "label": "Custom",
                "type": "string",
                "tag": "CUSTOM_FIELD_1",
                "default_value": "test",
                "visible": "0",
                "required": false,
                "custom_order": "0"
            }
        ]
    },
    "contact": {
        "company": "{list_contact_company}",
        "address_1": "{list_contact_address_1}",
        "address_2": "{list_contact_address_2}",
        "country": "{list_contact_country}",
        "state": "{list_contact_state}",
        "zip": "{list_contact_zip_code}",
        "phone": "{list_contact_phone}",
        "url": "{list_contact_website",
        "email": "{list_contact_email}",
        "city": "{list_contact_city}"
    },
    "statistics": {
        "subscriber_count": 1,
        "open_uniq_rate": 0,
        "click_rate": 0,
        "subscribe_rate": 0,
        "unsubscribe_rate": 0,
        "unsubscribe_count": 0,
        "unconfirmed_count": 1
    }
}
Code Sample
![]()
![]()
![]()
![]()
![]()
$curl = curl_init();

curl_setopt_array($curl, array(
  CURLOPT_URL => 'https://email.floppysend.com/api/v1/lists/{list_uid}?api_token={your_api_token}',
  CURLOPT_RETURNTRANSFER => true,
  CURLOPT_ENCODING => '',
  CURLOPT_MAXREDIRS => 10,
  CURLOPT_TIMEOUT => 0,
  CURLOPT_FOLLOWLOCATION => true,
  CURLOPT_HTTP_VERSION => CURL_HTTP_VERSION_1_1,
  CURLOPT_CUSTOMREQUEST => 'GET',
  CURLOPT_HTTPHEADER => array(
    'Cookie: XSRF-TOKEN={auto_generated}%3D%3D; laravel_session={auto_generated}%3D'
  ),
));

$response = curl_exec($curl);

curl_close($curl);
echo $response;
require "uri"
require "net/http"

url = URI("https://email.floppysend.com/api/v1/lists/{list_uid}?api_token={your_api_token}")

https = Net::HTTP.new(url.host, url.port)
https.use_ssl = true

request = Net::HTTP::Get.new(url)
request["Cookie"] = "XSRF-TOKEN={auto_generated}%3D%3D; laravel_session={auto_generated}%3D"

response = https.request(request)
puts response.read_body
//The OkHttpClient is an external package, you need to install it before making the request,
//And don't forget to add user permission for the internet inside "\MyApplication\app\src\main\AndroidManifest.xml"
//Also, you need to add required dependencies inside "MyApplication\app\build.gradle"

OkHttpClient client = new OkHttpClient().newBuilder()
  .build();
Request request = new Request.Builder()
  .url("https://email.floppysend.com/api/v1/lists/{list_uid}?api_token={your_api_token}")
  .method("GET", null)
  .addHeader("Cookie", "XSRF-TOKEN=eyJpdiI6Imlqc2Z0ellDWDVtU080ZkFo3FLb0FodFJGMVZiN0JmcWRzelBKZFhORmdDZnA4QVZMMWoxMGMxMUhGSExFTUw0RkFZZyIsIm1hYyI6IjRhZDQ4YWU3NjdkOGM0OTI3NzA5YzQxNDllYTBkZmRiZDBlODdlNTdhZjdlMjIzNDQwOWJkNTdmNmNjM2RiMWMifQ%3D%3D; laravel_session=eyJpdiI6InhLK0ExMzAzczFKQ3c2Y0VXSU1hd1E9PSIsInZhbHVlIjoia2VVT2U0ZGxCZDI2RDVXTk9na1wvSWNMQVM5eVBuMVRxOE13OTY0OHJqOGRtc1FBaXRXV3I5OTVvOXRIeVVUQ00iLCJtYWMiOiJkYmQyZGJjMmVhZTZjZDA2MjZiMzM3ZjUxMjZiNDUwNmNkYjIyMTBjNWUzMWU1NmMwNWQ0MWY1OTU2ZWY4NzEyIn0%3D")
  .build();
Response response = client.newCall(request).execute();
var client = new RestClient("https://email.floppysend.com/api/v1/lists/{list_uid}?api_token={your_api_token}");
client.Timeout = -1;
var request = new RestRequest(Method.GET);
request.AddHeader("Cookie", "XSRF-TOKEN={auto_generated}%3D%3D; laravel_session={auto_generated}%3D");
IRestResponse response = client.Execute(request);
Console.WriteLine(response.Content);
//Make sure to import Axios and install npm packages before doing the request

var axios = require('axios');

var config = {
  method: 'get',
  url: 'https://email.floppysend.com/api/v1/lists/{list_uid}?api_token={your_api_token}',
  headers: { }
};

axios(config)
.then(function (response) {
  console.log(JSON.stringify(response.data));
})
.catch(function (error) {
  console.log(error);
});
All Campaigns
Get all your Campaigns with one click with FloppyEmail API, Follow the instructions and ingrate our API with your system or application
Parameters
-
GET METHOD
https://email.floppysend.com/api/v1/campaignsYou can get your API Token from the integration section in the dashboard
https://email.floppysend.com/api/v1/campaigns?api_token={your_api_token}
Note:
Due to data protection reasons the API is only accessible via HTTPs with TLS versions 1.0, 1.1 or 1.2.
|
Parameter |
Type |
Required |
Description |
|---|---|---|---|
|
api_token |
string |
Yes |
Your api token |
Response
|
Key |
Value |
|---|---|
|
uid |
Campaign uid |
|
name |
Campaign name |
|
type |
Campaign type |
|
subject |
Campaign subject |
|
html |
Campaign email template |
|
plain |
Campaign plain email |
|
from_email |
Campaign from email |
|
from_name |
Campaign from name |
|
reply_to |
Email reply |
|
status |
Campaign status |
|
delivery_at |
Delivery date |
|
created_at |
Campaign create date |
|
updated_at |
Campaign last update date |
Note:
If api_token was missing you will be redirect to login page
[
    {
        "uid": "{campaign_uid}",
        "name": "{campaign_name}",
        "type": "{campaign_type}",
        "subject": "{campaign_subject}",
        "html": "{campaign_html_template}",
        "plain": "{campaign_plain}",
        "from_email": "{campaign_frm_email}",
        "from_name": "{campaign_from_name}",
        "reply_to": "{email_reply_to}",
        "status": "{campaign_status}",
        "delivery_at": "2021-06-23 03:04:01",
        "created_at": "2021-06-23 03:00:41",
        "updated_at": "2021-07-06 04:49:30"
    },
    {
        "uid": "{campaign_uid}",
        "name": "{campaign_name}",
        "type": "{campaign_type}",
        "subject": "{campaign_subject}",
        "html": "{campaign_html_template}",
        "plain": "{campaign_plain}",
        "from_email": "{campaign_frm_email}",
        "from_name": "{campaign_from_name}",
        "reply_to": "{email_reply_to}",
        "status": "{campaign_status}",
        "delivery_at": "2021-07-02 07:30:01",
        "created_at": "2021-06-29 02:31:04",
        "updated_at": "2021-07-06 04:49:30"
    }
]
Code Sample
![]()
![]()
![]()
![]()
![]()
$curl = curl_init();

curl_setopt_array($curl, array(
  CURLOPT_URL => 'https://email.floppysend.com/api/v1/campaigns?api_token=GvwKoUEIVEGCU8DZvC0qi3Q5s',
  CURLOPT_RETURNTRANSFER => true,
  CURLOPT_ENCODING => '',
  CURLOPT_MAXREDIRS => 10,
  CURLOPT_TIMEOUT => 0,
  CURLOPT_FOLLOWLOCATION => true,
  CURLOPT_HTTP_VERSION => CURL_HTTP_VERSION_1_1,
  CURLOPT_CUSTOMREQUEST => 'GET',
  CURLOPT_HTTPHEADER => array(
    'Cookie: XSRF-TOKEN={auto_generated}%3D%3D; laravel_session={auto_generated}%3D'
  ),
));

$response = curl_exec($curl);

curl_close($curl);
echo $response;
require "uri"
require "net/http"

url = URI("https://email.floppysend.com/api/v1/campaigns?api_token={your_api_token}")

https = Net::HTTP.new(url.host, url.port)
https.use_ssl = true

request = Net::HTTP::Get.new(url)
request["Cookie"] = "XSRF-TOKEN={auto_generated}%3D%3D; laravel_session={auto_generated}%3D"

response = https.request(request)
puts response.read_body
//The OkHttpClient is an external package, you need to install it before making the request,
//And don't forget to add user permission for the internet inside "\MyApplication\app\src\main\AndroidManifest.xml"
//Also, you need to add required dependencies inside "MyApplication\app\build.gradle"

OkHttpClient client = new OkHttpClient().newBuilder()
  .build();
Request request = new Request.Builder()
  .url("https://email.floppysend.com/api/v1/campaigns?api_token={your_api_token}")
  .method("GET", null)
  .addHeader("Cookie", "XSRF-TOKEN={auto_generated}%3D%3D; laravel_session={auto_generated}%3D")
  .build();
Response response = client.newCall(request).execute();
var client = new RestClient("https://email.floppysend.com/api/v1/campaigns?api_token={your_api_token}");
client.Timeout = -1;
var request = new RestRequest(Method.GET);
request.AddHeader("Cookie", "XSRF-TOKEN={auto_generated}%3D%3D; laravel_session={auto_generated}%3D");
IRestResponse response = client.Execute(request);
Console.WriteLine(response.Content);
//Make sure to import Axios and install npm packages before doing the request

var axios = require('axios');

var config = {
  method: 'get',
  url: 'https://email.floppysend.com/api/v1/campaigns?api_token={your_api_token}',
  headers: { }
};

axios(config)
.then(function (response) {
  console.log(JSON.stringify(response.data));
})
.catch(function (error) {
  console.log(error);
});
Show A Specific Campaign
Get a specific Campaign with one click with FloppyEmail API, Follow the instructions and ingrate our API with your system or application
Parameters
-
GET METHOD
https://email.floppysend.com/api/v1/campaigns/{uid}You can get your API Token from the integration section in the dashboard
https://email.floppysend.com/api/v1/campaigns/{uid}?api_token={your_api_token}
Note:
Due to data protection reasons the API is only accessible via HTTPs with TLS versions 1.0, 1.1 or 1.2.
|
Parameter |
Type |
Required |
Description |
|---|---|---|---|
|
api_token |
string |
Yes |
Your api token |
Response
|
Key |
Value |
|---|---|
|
uid |
Campaign uid |
|
name |
Campaign name |
|
type |
Campaign type |
|
subject |
Campaign subject |
|
html |
Campaign email template |
|
plain |
Campaign plain email |
|
from_email |
Campaign from email |
|
from_name |
Campaign from name |
|
reply_to |
Email reply |
|
status |
Campaign status |
|
delivery_at |
Delivery date |
|
created_at |
Campaign create date |
|
updated_at |
Campaign last update date |
Note:
If api_token was missing you will be redirect to login page
{
    "campaign": {
        "uid": "{campaign_uid}",
        "name": "{campaign_name}",
        "list": "{campaign_list}",
        "segment": "{campaign_segment}",
        "default_subject": {campaign_default_subject},
        "from_email": "{campain_from_email}",
        "from_name": "{campaign_from_list}",
        "remind_message": null,
        "status": "{campaign_status}",
        "created_at": "2021-06-23T03:00:41.000000Z",
        "updated_at": "2021-07-06T04:49:30.000000Z"
    },
    "statistics": {
        "subscriber_count": 1,
        "uniq_open_rate": 0,
        "delivered_rate": 0,
        "open_count": 0,
        "uniq_open_count": 0,
        "last_open": "",
        "click_rate": 0,
        "click_per_uniq_open": 0,
        "click_count": 0,
        "abuse_feedback_count": 0,
        "last_click": "",
        "bounce_count": 0,
        "unsubscribe_count": 0,
        "links": [],
        "top_locations": [],
        "top_open_subscribers": []
    }
}
Code Sample
![]()
![]()
![]()
![]()
![]()
$curl = curl_init();

curl_setopt_array($curl, array(
  CURLOPT_URL => 'https://email.floppysend.com/api/v1/campaigns/{campign_uid}?api_token={your_api_token}',
  CURLOPT_RETURNTRANSFER => true,
  CURLOPT_ENCODING => '',
  CURLOPT_MAXREDIRS => 10,
  CURLOPT_TIMEOUT => 0,
  CURLOPT_FOLLOWLOCATION => true,
  CURLOPT_HTTP_VERSION => CURL_HTTP_VERSION_1_1,
  CURLOPT_CUSTOMREQUEST => 'GET',
  CURLOPT_HTTPHEADER => array(
    'Cookie: XSRF-TOKEN={auto_generated}%3D%3D; laravel_session={auto_generated}%3D'
  ),
));

$response = curl_exec($curl);

curl_close($curl);
echo $response;
require "uri"
require "net/http"

url = URI("https://email.floppysend.com/api/v1/campaigns/{campign_uid}?api_token={your_api_token}'")

https = Net::HTTP.new(url.host, url.port)
https.use_ssl = true

request = Net::HTTP::Get.new(url)
request["Cookie"] = "XSRF-TOKEN={auto_generated}%3D%3D; laravel_session={auto_generated}%3D"

response = https.request(request)
puts response.read_body
//The OkHttpClient is an external package, you need to install it before making the request,
//And don't forget to add user permission for the internet inside "\MyApplication\app\src\main\AndroidManifest.xml"
//Also, you need to add required dependencies inside "MyApplication\app\build.gradle"

OkHttpClient client = new OkHttpClient().newBuilder()
  .build();
Request request = new Request.Builder()
  .url("https://email.floppysend.com/api/v1/campaigns/{campign_uid}?api_token={your_api_token}'")
  .method("GET", null)
  .addHeader("Cookie", "XSRF-TOKEN={auto_generated}%3D%3D; laravel_session={auto_generated}%3D")
  .build();
Response response = client.newCall(request).execute();
var client = new RestClient("https://email.floppysend.com/api/v1/campaigns/{campign_uid}?api_token={your_api_token}'");
client.Timeout = -1;
var request = new RestRequest(Method.GET);
request.AddHeader("Cookie", "XSRF-TOKEN={auto_generated}%3D%3D; laravel_session={auto_generated}%3D");
IRestResponse response = client.Execute(request);
Console.WriteLine(response.Content);
//Make sure to import Axios and install npm packages before doing the request

var axios = require('axios');

var config = {
  method: 'get',
  url: 'https://email.floppysend.com/api/v1/campaigns/{campign_uid}?api_token={your_api_token}'',
  headers: { }
};

axios(config)
.then(function (response) {
  console.log(JSON.stringify(response.data));
})
.catch(function (error) {
  console.log(error);
});
Custom Feild List
Add a custo field to a specific list with one click with FloppyEmail API, Follow the instructions and ingrate our API with your system or application
Parameters
-
POST METHOD
https://email.floppysend.com/api/v1/lists/{uid}/add-fieldYou can get your API Token from the integration section in the dashboard
https://email.floppysend.com/api/v1/lists/{uid}/add-field?api_token={your_api_token}
Note:
Due to data protection reasons the API is only accessible via HTTPs with TLS versions 1.0, 1.1 or 1.2.
|
Parameter |
Type |
Required |
Description |
|---|---|---|---|
|
api_token |
string |
Yes |
Your api token |
|
type |
string |
Yes |
text, number, datetime. |
|
label |
string |
Yes |
Field label |
|
tag |
string |
Yes |
Field unique tag |
|
default_value |
string |
Optional |
Field unique tag |
Response
|
Key |
Value |
|---|---|
|
mail_list_id |
List id |
|
type |
Field type |
|
label |
Field label |
|
tag |
Field tag |
|
default_value |
Field default subject |
|
uid |
List uid |
|
created_at |
Field create date |
|
updated_at |
Field last update date |
|
id |
Field id |
{
    "status": 1,
    "message": "List's field was created",
    "field": {
        "mail_list_id": "{list_id}",
        "type": "{new_field_type}",
        "label": "{new_field_label}",
        "tag": "{new_field_tag}",
        "default_value": "{new_field_value}",
        "uid": "{uid}",
        "updated_at": "2021-07-06 07:46:29",
        "created_at": "2021-07-06 07:46:29",
        "id": "{new_field_id}"
    }
}
|
Http Error Code |
Error Key |
Error Description |
Note |
|---|---|---|---|
|
403 |
type |
The type field is required. |
When the type field is missing |
|
403 |
type |
The selected type is invalid. |
When the the type is not |
|
403 |
label |
The label field is required. |
When the label field name is missing |
|
403 |
tag |
The tag field is required. |
When the tag field is missing |
Note:
If api_token was missing you will be redirect to login page
Code Sample
![]()
![]()
![]()
![]()
![]()
$curl = curl_init();

curl_setopt_array($curl, array(
  CURLOPT_URL => 'https://email.floppysend.com/api/v1/lists/{list_uid}/add-field?api_token={your_api_token}&type={field_type}&label={field_label}&tag={field_tag}&default_value={field-value}',
  CURLOPT_RETURNTRANSFER => true,
  CURLOPT_ENCODING => '',
  CURLOPT_MAXREDIRS => 10,
  CURLOPT_TIMEOUT => 0,
  CURLOPT_FOLLOWLOCATION => true,
  CURLOPT_HTTP_VERSION => CURL_HTTP_VERSION_1_1,
  CURLOPT_CUSTOMREQUEST => 'POST',
  CURLOPT_HTTPHEADER => array(
    'Cookie: XSRF-TOKEN={auto_generated}%3D%3D; laravel_session={auto_generated}%3D'
  ),
));

$response = curl_exec($curl);

curl_close($curl);
echo $response;
require "uri"
require "net/http"

url = URI("https://email.floppysend.com/api/v1/lists/{list_uid}/add-field?api_token={your_api_token}&type={field_type}&label={field_label}&tag={field_tag}&default_value={field-value}")

https = Net::HTTP.new(url.host, url.port)
https.use_ssl = true

request = Net::HTTP::Post.new(url)
request["Cookie"] = "XSRF-TOKEN={auto_generated}%3D%3D; laravel_session={auto_generated}%3D"

response = https.request(request)
puts response.read_body
//The OkHttpClient is an external package, you need to install it before making the request,
//And don't forget to add user permission for the internet inside "\MyApplication\app\src\main\AndroidManifest.xml"
//Also, you need to add required dependencies inside "MyApplication\app\build.gradle"

OkHttpClient client = new OkHttpClient().newBuilder()
  .build();
MediaType mediaType = MediaType.parse("text/plain");
RequestBody body = RequestBody.create(mediaType, "");
Request request = new Request.Builder()
  .url("https://email.floppysend.com/api/v1/lists/{uid}/add-field?api_token={your_api_token}&type={field_type}&label={field_label}&tag={field_tag}&default_value={field-value}")
  .method("POST", body)
  .addHeader("Cookie", "XSRF-TOKEN={auto_generated}%3D%3D; laravel_session={auto_generated}%3D")
  .build();
Response response = client.newCall(request).execute();
var client = new RestClient("https://email.floppysend.com/api/v1/lists/{list_uid}/add-field?api_token={your_api_token}&type={field_type}&label={field_label}&tag={field_tag}&default_value={field-value}");
client.Timeout = -1;
var request = new RestRequest(Method.POST);
request.AddHeader("Cookie", "XSRF-TOKEN={auto_generated}%3D%3D; laravel_session={auto_generated}%3D");
IRestResponse response = client.Execute(request);
Console.WriteLine(response.Content);
//Make sure to import Axios and install npm packages before doing the request

var axios = require('axios');

var config = {
  method: 'post',
  url: 'https://email.floppysend.com/api/v1/lists/{list_uid}/add-field?api_token={your_api_token}&type={field_type}&label={field_label}&tag={field_tag}&default_value={field-value}',
  headers: { }
};

axios(config)
.then(function (response) {
  console.log(JSON.stringify(response.data));
})
.catch(function (error) {
  console.log(error);
});
Subscribers
Get all subscribers from a specific list with one click with FloppyEmail API, Follow the instructions and ingrate our API with your system or application
Parameters
-
GET METHOD
https://email.floppysend.com/api/v1/subscribersYou can get your API Token from the integration section in the dashboard
https://email.floppysend.com/api/v1/subscribers?list_uid={list_uid}&api_token={your_api_token}
Note:
Due to data protection reasons the API is only accessible via HTTPs with TLS versions 1.0, 1.1 or 1.2.
|
Parameter |
Type |
Required |
Description |
|---|---|---|---|
|
api_token |
string |
Yes |
Your api token |
|
list_uid |
string |
Yes |
List uid |
|
open |
yes or no |
Optional |
yes - opened some campaigns
|
|
click |
yes or no |
Optional |
yes - clicked some campaigns
|
Response
|
Key |
Value |
|---|---|
|
uid |
List uid |
|
|
Subscriber email |
|
status |
Subscriber status |
|
FIRST_NAME |
Subscriber first name |
|
LAST_NAME |
Subscriber last name |
{
    "uid": "{uid}",
    "email": "{subscriber_email}",
    "status": "subscribed",
    "FIRST_NAME": "{subsriber_first_name}",
    "LAST_NAME": "{subscriber_last_name}"
}
|
Http Error Code |
Error Key |
Error Description |
Note |
|---|---|---|---|
|
400 |
message |
List not found |
When the List uid is missing |
Note:
If api_token was missing you will be redirect to login page
Code Sample
![]()
![]()
![]()
![]()
![]()
$curl = curl_init();

curl_setopt_array($curl, array(
  CURLOPT_URL => 'https://email.floppysend.com/api/v1/subscribers?open=yes&click%20%20%20=yes&api_token={your_api_token}&list_uid={list_uid}',
  CURLOPT_RETURNTRANSFER => true,
  CURLOPT_ENCODING => '',
  CURLOPT_MAXREDIRS => 10,
  CURLOPT_TIMEOUT => 0,
  CURLOPT_FOLLOWLOCATION => true,
  CURLOPT_HTTP_VERSION => CURL_HTTP_VERSION_1_1,
  CURLOPT_CUSTOMREQUEST => 'GET',
  CURLOPT_HTTPHEADER => array(
    'Cookie: XSRF-TOKEN={auto_generated}%3D%3D; laravel_session={auto_generated}%3D'
  ),
));

$response = curl_exec($curl);

curl_close($curl);
echo $response;
require "uri"
require "net/http"

url = URI("https://email.floppysend.com/api/v1/subscribers?open=yes&click=yes&api_token={your_api_token}&list_uid={list_uid}")

https = Net::HTTP.new(url.host, url.port)
https.use_ssl = true

request = Net::HTTP::Get.new(url)
request["Cookie"] = "XSRF-TOKEN={auto_generated}%3D%3D; laravel_session={auto_generated}%3D"

response = https.request(request)
puts response.read_body
//The OkHttpClient is an external package, you need to install it before making the request,
//And don't forget to add user permission for the internet inside "\MyApplication\app\src\main\AndroidManifest.xml"
//Also, you need to add required dependencies inside "MyApplication\app\build.gradle"

OkHttpClient client = new OkHttpClient().newBuilder()
  .build();
Request request = new Request.Builder()
  .url("https://email.floppysend.com/api/v1/subscribers?open=yes&click=yes&api_token={your_api_token}&list_uid={list_uid}")
  .method("GET", null)
  .addHeader("Cookie", "XSRF-TOKEN={auto_generated}%3D%3D; laravel_session={auto_generated}%3D")
  .build();
Response response = client.newCall(request).execute();
var client = new RestClient("https://email.floppysend.com/api/v1/subscribers?open=yes&click=yes&api_token={your_api_token}&list_uid={list_uid}");
client.Timeout = -1;
var request = new RestRequest(Method.GET);
request.AddHeader("Cookie", "XSRF-TOKEN={auto_generated}%3D%3D; laravel_session={auto_generated}%3D");
IRestResponse response = client.Execute(request);
Console.WriteLine(response.Content);
//Make sure to import Axios and install npm packages before doing the request

var axios = require('axios');

var config = {
  method: 'get',
  url: 'https://email.floppysend.com/api/v1/subscribers?list_uid={list_uid}&api_token={your_api_token}',
  headers: { }
};

axios(config)
.then(function (response) {
  console.log(JSON.stringify(response.data));
})
.catch(function (error) {
  console.log(error);
});
Add Subscriber
Add a subscriber to a specific list with one click with FloppyEmail API, Follow the instructions and ingrate our API with your system or application
Parameters
-
POST METHOD
https://email.floppysend.com/api/v1/subscribersYou can get your API Token from the integration section in the dashboard
https://email.floppysend.com/api/v1/subscribers?list_uid={list_uid}&api_token={your_api_token}&EMAIL={ubscriber_email}&tag={subscriber_tag}&FIRST_NAME={subscriber_first_name}&LAST_NAME={subscriber_last_name}&CUSTOM_FIELD_1={subscriber_ustom-field}
Note:
Due to data protection reasons the API is only accessible via HTTPs with TLS versions 1.0, 1.1 or 1.2.
|
Parameter |
Type |
Required |
Description |
|---|---|---|---|
|
api_token |
string |
Yes |
Your api token |
|
list_uid |
string |
Yes |
List uid |
|
|
string |
Yes |
Subscriber email |
|
tag |
string |
Optional |
Subscriber's tags, seperated by a comma |
|
FIRST_NAME |
string |
Optional |
Subscriber's firt name |
|
LAST_NAME |
string |
Optional |
Subscriber's last name |
|
CUSTOM_FIELD_1 |
string |
Optional |
Subscriber's custom field |
Response
|
Key |
Value |
|---|---|
|
message |
The response message |
|
subscriber_uid |
New subscriber id |
{
    "status": 1,
    "message": "Confirmation email sent to the subscriber",
    "subscriber_uid": "{subscriber_uid}"
}
|
Http Error Code |
Error Key |
Error Description |
Note |
|---|---|---|---|
|
400 |
message |
List not found |
When the List uid is missing |
|
403 |
|
The email field is required. |
When the subscriber's email is missing |
Note:
If api_token was missing you will be redirect to login page
Code Sample
![]()
![]()
![]()
![]()
![]()
$curl = curl_init();

curl_setopt_array($curl, array(
  CURLOPT_URL => 'https://email.floppysend.com/api/v1/subscribers?list_uid={list_uid}&api_token={your_api_token}&tag={subscriber_tag}&FIRST_NAME={subscriber_first_name}&LAST_NAME={subscriber_last_name}',
  CURLOPT_RETURNTRANSFER => true,
  CURLOPT_ENCODING => '',
  CURLOPT_MAXREDIRS => 10,
  CURLOPT_TIMEOUT => 0,
  CURLOPT_FOLLOWLOCATION => true,
  CURLOPT_HTTP_VERSION => CURL_HTTP_VERSION_1_1,
  CURLOPT_CUSTOMREQUEST => 'POST',
  CURLOPT_HTTPHEADER => array(
    'Cookie: XSRF-TOKEN={auto_generated}%3D%3D; laravel_session={auto_generated}%3D'
  ),
));

$response = curl_exec($curl);

curl_close($curl);
echo $response;
require "uri"
require "net/http"

url = URI("https://email.floppysend.com/api/v1/subscribers?list_uid={list_uid}&api_token={your_api_token}&tag={subscriber-tag}&FIRST_NAME={subscriber-first_name}&LAST_NAME={subscriber_last_name}")

https = Net::HTTP.new(url.host, url.port)
https.use_ssl = true

request = Net::HTTP::Post.new(url)
request["Cookie"] = "XSRF-TOKEN={auto_generated}%3D%3D; laravel_session={auto_generated}%3D"

response = https.request(request)
puts response.read_body
//The OkHttpClient is an external package, you need to install it before making the request,
//And don't forget to add user permission for the internet inside "\MyApplication\app\src\main\AndroidManifest.xml"
//Also, you need to add required dependencies inside "MyApplication\app\build.gradle"

OkHttpClient client = new OkHttpClient().newBuilder()
  .build();
MediaType mediaType = MediaType.parse("text/plain");
RequestBody body = RequestBody.create(mediaType, "");
Request request = new Request.Builder()
  .url("https://email.floppysend.com/api/v1/subscribers?list_uid={list_uid}&api_token={your_api_token}&tag={subscriber-tag}&FIRST_NAME={subscriber-first_name}&LAST_NAME={subscriber_last_name}")
  .method("POST", body)
  .addHeader("Cookie", "XSRF-TOKEN={auto_generated}%3D%3D; laravel_session={auto_generated}%3D")
  .build();
Response response = client.newCall(request).execute();
var client = new RestClient("https://email.floppysend.com/api/v1/subscribers?list_uid={list_uid}&api_token={your_api_token}&tag={subscriber-tag}&FIRST_NAME={subscriber-first_name}&LAST_NAME={subscriber_last_name}");
client.Timeout = -1;
var request = new RestRequest(Method.POST);
request.AddHeader("Cookie", "XSRF-TOKEN={auto_generated}%3D%3D; laravel_session={auto_generated}%3D");
IRestResponse response = client.Execute(request);
Console.WriteLine(response.Content);
//Make sure to import Axios and install npm packages before doing the request

var axios = require('axios');

var config = {
  method: 'post',
  url: 'https://email.floppysend.com/api/v1/subscribers?list_uid={list_uid}&api_token={your_api_token}&EMAIL={subscriber_email}&{subscriber-tag}&FIRST_NAME={subscriber-first_name}&LAST_NAME={subscriber_last_name}',
  headers: { }
};

axios(config)
.then(function (response) {
  console.log(JSON.stringify(response.data));
})
.catch(function (error) {
  console.log(error);
});
Specific Subscriber
Get a specific subsriber from a list with one click with FloppyEmail API, Follow the instructions and ingrate our API with your system or application
Parameters
-
GET METHOD
https://email.floppysend.com/api/v1/subscribers/{uid}You can get your API Token from the integration section in the dashboard
https://email.floppysend.com/api/v1/subscribers?list_uid={lidt_if}&id={subscriber_id}&api_token={your_api_token}
Note:
Due to data protection reasons the API is only accessible via HTTPs with TLS versions 1.0, 1.1 or 1.2.
|
Parameter |
Type |
Required |
Description |
|---|---|---|---|
|
api_token |
string |
Yes |
Your api token |
|
list_uid |
string |
Yes |
List uid |
|
id |
string |
Yes |
Subscriber Id |
Response
|
Key |
Value |
|---|---|
|
uid |
List uid |
|
|
Subscriber email |
|
status |
Subscriber status |
|
FIRST_NAME |
Subscriber first name |
|
LAST_NAME |
Subscriber last name |
|
CUSTOM_FIELD_1 |
Subscriber custome field |
[
    {
        "uid": "{list_uid}",
        "email": "{subsriber_email}",
        "status": "{subscriber_status}",
        "FIRST_NAME": "{subscriber-first_name}",
        "LAST_NAME": "{subscriber_last_name}",
        "CUSTOM_FIELD_1": {subscriber_custom_field}
    }
]
|
Http Error Code |
Error Key |
Error Description |
Note |
|---|---|---|---|
|
400 |
message |
List not found |
When the List uid is missing |
|
403 |
|
The email field is required. |
When the subscriber's email is missing |
Note:
If api_token was missing you will be redirect to login page
Code Sample
![]()
![]()
![]()
![]()
![]()
$curl = curl_init();

curl_setopt_array($curl, array(
  CURLOPT_URL => 'https://email.floppysend.com/api/v1/subscribers?list_uid={list_uid}&api_token={your_api_token}',
  CURLOPT_RETURNTRANSFER => true,
  CURLOPT_ENCODING => '',
  CURLOPT_MAXREDIRS => 10,
  CURLOPT_TIMEOUT => 0,
  CURLOPT_FOLLOWLOCATION => true,
  CURLOPT_HTTP_VERSION => CURL_HTTP_VERSION_1_1,
  CURLOPT_CUSTOMREQUEST => 'GET',
  CURLOPT_HTTPHEADER => array(
    'Cookie: XSRF-TOKEN={auto_generated}%3D%3D; laravel_session={auto_generated}%3D'
  ),
));

$response = curl_exec($curl);

curl_close($curl);
echo $response;
require "uri"
require "net/http"

url = URI("https://email.floppysend.com/api/v1/subscribers?list_uid={list_uid}&api_token={your_api_token}")

https = Net::HTTP.new(url.host, url.port)
https.use_ssl = true

request = Net::HTTP::Get.new(url)
request["Cookie"] = "XSRF-TOKEN={auto_generated}%3D%3D; laravel_session={auto_generated}%3D"

response = https.request(request)
puts response.read_body
//The OkHttpClient is an external package, you need to install it before making the request,
//And don't forget to add user permission for the internet inside "\MyApplication\app\src\main\AndroidManifest.xml"
//Also, you need to add required dependencies inside "MyApplication\app\build.gradle"

OkHttpClient client = new OkHttpClient().newBuilder()
  .build();
Request request = new Request.Builder()
  .url("https://email.floppysend.com/api/v1/subscribers?list_uid={list_uid}&api_token={your_api_token}")
  .method("GET", null)
  .addHeader("Cookie", "XSRF-TOKEN={auto_generated}%3D%3D; laravel_session={auto_generated}%3D")
  .build();
Response response = client.newCall(request).execute();
var client = new RestClient("https://email.floppysend.com/api/v1/subscribers?list_uid={list_uid}&api_token={your_api_token}");
client.Timeout = -1;
var request = new RestRequest(Method.GET);
request.AddHeader("Cookie", "XSRF-TOKEN={auto_generated}%3D%3D; laravel_session={auto_generated}%3D");
IRestResponse response = client.Execute(request);
Console.WriteLine(response.Content);
//Make sure to import Axios and install npm packages before doing the request

var axios = require('axios');

var config = {
  method: 'get',
  url: 'https://email.floppysend.com/api/v1/subscribers?list_uid={list_uid}&api_token={your_api_token}',
  headers: { }
};

axios(config)
.then(function (response) {
  console.log(JSON.stringify(response.data));
})
.catch(function (error) {
  console.log(error);
});
Update Subscriber
Update a specific subsriber information from a list with one click with FloppyEmail API,
Follow the instructions and ingrate
our API with your system or application
Parameters
-
PATCH METHOD
https://email.floppysend.com/api/v1/subscribers/{uid}You can get your API Token from the integration section in the dashboard
https://email.floppysend.com/api/v1/subscribers/{subscriber_uid}?api_token={your-api-token}&EMAIL={subscriber_email}
Note:
Due to data protection reasons the API is only accessible via HTTPs with TLS versions 1.0, 1.1 or 1.2.
|
Parameter |
Type |
Required |
Description |
|---|---|---|---|
|
api_token |
string |
Yes |
Your api token |
|
subscriber_uid |
string |
Yes |
Subscriber uid |
|
|
string |
Yes |
Subscriber email |
Response
|
Key |
Value |
|---|---|
|
message |
Response message |
|
subscriber_uid |
Subscriber uid |
{
    "status": 1,
    "message": "Subscriber was successfully updated",
    "subscriber_uid": "{subscriber_uid}"
}
|
Http Error Code |
Error Key |
Error Description |
Note |
|---|---|---|---|
|
401 |
message |
Unauthorized |
Subscriber uid invalid |
|
403 |
|
The email field is required. |
When the subscriber's email is missing |
Note:
If api_token was missing you will be redirect to login page
Code Sample
![]()
![]()
![]()
![]()
![]()
$curl = curl_init();

curl_setopt_array($curl, array(
  CURLOPT_URL => 'https://email.floppysend.com/api/v1/subscribers/{subscriber_uid}?api_token={your_api_token}&EMAIL={subscriber_new_email}',
  CURLOPT_RETURNTRANSFER => true,
  CURLOPT_ENCODING => '',
  CURLOPT_MAXREDIRS => 10,
  CURLOPT_TIMEOUT => 0,
  CURLOPT_FOLLOWLOCATION => true,
  CURLOPT_HTTP_VERSION => CURL_HTTP_VERSION_1_1,
  CURLOPT_CUSTOMREQUEST => 'PATCH',
));

$response = curl_exec($curl);

curl_close($curl);
echo $response;
require "uri"
require "net/http"

url = URI("https://email.floppysend.com/api/v1/subscribers/{subscriber_uid}?api_token={your_api_token}&EMAIL={subscriber_new_email}")

https = Net::HTTP.new(url.host, url.port)
https.use_ssl = true

request = Net::HTTP::Patch.new(url)

response = https.request(request)
puts response.read_body
//The OkHttpClient is an external package, you need to install it before making the request,
//And don't forget to add user permission for the internet inside "\MyApplication\app\src\main\AndroidManifest.xml"
//Also, you need to add required dependencies inside "MyApplication\app\build.gradle"

OkHttpClient client = new OkHttpClient().newBuilder()
  .build();
MediaType mediaType = MediaType.parse("text/plain");
RequestBody body = RequestBody.create(mediaType, "");
Request request = new Request.Builder()
  .url("https://email.floppysend.com/api/v1/subscribers/{subscriber_uid}?api_token={your_api_token}&EMAIL={subscriber_new_email}")
  .method("PATCH", body)
  .build();
Response response = client.newCall(request).execute();
var client = new RestClient("https://email.floppysend.com/api/v1/subscribers/{subscriber_uid}?api_token={your_api_token}&EMAIL={subscriber_new_email}");
client.Timeout = -1;
var request = new RestRequest(Method.PATCH);
IRestResponse response = client.Execute(request);
Console.WriteLine(response.Content);
//Make sure to import Axios and install npm packages before doing the request

var axios = require('axios');

var config = {
  method: 'patch',
  url: 'https://email.floppysend.com/api/v1/subscribers/{subscriber_uid}?api_token={your_api_token}&EMAIL={subscriber_new_email}',
  headers: { }
};

axios(config)
.then(function (response) {
  console.log(JSON.stringify(response.data));
})
.catch(function (error) {
  console.log(error);
});
Subscriber Per Email
Get a specific subsriber by email searching from a list with one click with FloppyEmail API,
Follow the instructions and ingrate
our API with your system or application
Parameters
-
GET METHOD
https://email.floppysend.com/api/v1/subscribers/email/{email}You can get your API Token from the integration section in the dashboard
https://email.floppysend.com/api/v1/subscribers/email/{subsriber_email}?api_token={your_api_token}
Note:
Due to data protection reasons the API is only accessible via HTTPs with TLS versions 1.0, 1.1 or 1.2.
|
Parameter |
Type |
Required |
Description |
|---|---|---|---|
|
api_token |
string |
Yes |
Your api token |
|
subscriber_email |
string |
Yes |
Subscriber email |
Response
|
Key |
Value |
|---|---|
|
uid |
Subscriber uid |
|
list_uid |
List uid |
|
|
Subscriber email |
|
status |
Subscriber status |
|
source |
Subscriber source |
|
ip_address |
Subscriber Ip address |
|
FIRST_NAME |
Subscriber first name |
|
LAST_NAME |
Subscriber last name |
{
    "subscribers": [
        {
            "uid": "{subscriber-uid}",
            "list_uid": "{list_uid}",
            "email": "{subscriber_email}",
            "status": "{subscriber_status}",
            "source": {subscriber_source},
            "ip_address": "{subscriber_ap_address}",
            "FIRST_NAME": "{subscriber_first_name}",
            "LAST_NAME": "{subscriber_last_name}"
        }
    ]
}
Note:
If api_token was missing you will be redirect to login page
Code Sample
![]()
![]()
![]()
![]()
![]()
$curl = curl_init();

curl_setopt_array($curl, array(
  CURLOPT_URL => 'https://email.floppysend.com/api/v1/subscribers/email/{subscriber_email}?api_token={your-api_token}',
  CURLOPT_RETURNTRANSFER => true,
  CURLOPT_ENCODING => '',
  CURLOPT_MAXREDIRS => 10,
  CURLOPT_TIMEOUT => 0,
  CURLOPT_FOLLOWLOCATION => true,
  CURLOPT_HTTP_VERSION => CURL_HTTP_VERSION_1_1,
  CURLOPT_CUSTOMREQUEST => 'GET',
));

$response = curl_exec($curl);

curl_close($curl);
echo $response;
require "uri"
require "net/http"

url = URI("https://email.floppysend.com/api/v1/subscribers/email/{subscriber_email}?api_token={your-api_token}")

https = Net::HTTP.new(url.host, url.port)
https.use_ssl = true

request = Net::HTTP::Get.new(url)

response = https.request(request)
puts response.read_body
//The OkHttpClient is an external package, you need to install it before making the request,
//And don't forget to add user permission for the internet inside "\MyApplication\app\src\main\AndroidManifest.xml"
//Also, you need to add required dependencies inside "MyApplication\app\build.gradle"

OkHttpClient client = new OkHttpClient().newBuilder()
  .build();
Request request = new Request.Builder()
  .url("https://email.floppysend.com/api/v1/subscribers/email/{subscriber_email}?api_token={your-api_token}")
  .method("GET", null)
  .build();
Response response = client.newCall(request).execute();
var client = new RestClient("https://email.floppysend.com/api/v1/subscribers/email/{subscriber_email}?api_token={your-api_token}");
client.Timeout = -1;
var request = new RestRequest(Method.GET);
IRestResponse response = client.Execute(request);
Console.WriteLine(response.Content);
//Make sure to import Axios and install npm packages before doing the request

var axios = require('axios');

var config = {
  method: 'get',
  url: 'https://email.floppysend.com/api/v1/subscribers/email/{subscriber_email}?api_token={your-api_token}',
  headers: { }
};

axios(config)
.then(function (response) {
  console.log(JSON.stringify(response.data));
})
.catch(function (error) {
  console.log(error);
});
Subscribe A Subscriber
Subsriber a subsriber to a list with one click with FloppyEmail API,
Follow the instructions and ingrate
our API with your system or application
Parameters
-
PATCH METHOD
https://email.floppysend.com/api/v1/lists/{list_uid}/subscribers/{uid}/subscribeYou can get your API Token from the integration section in the dashboard
https://email.floppysend.com/api/v1/lists/{list_uid}/subscribers/{subscriber_uid}/subscribe?api_token={your_api_token}
Note:
Due to data protection reasons the API is only accessible via HTTPs with TLS versions 1.0, 1.1 or 1.2.
|
Parameter |
Type |
Required |
Description |
|---|---|---|---|
|
api_token |
string |
Yes |
Your api token |
|
subscriber_uid |
string |
Yes |
Subscriber uid |
|
list_uid |
string |
Yes |
List uid |
Response
|
Key |
Value |
|---|---|
|
message |
Response message |
{
    "status": 1,
    "message": "Subscribed"
}
|
Http Error Code |
Error Key |
Error Description |
Note |
|---|---|---|---|
|
404 |
message |
List not found |
List uid invalid |
|
404 |
message |
Item not found |
Subscriber uid invalid |
Note:
If api_token was missing you will be redirect to login page
Code Sample
![]()
![]()
![]()
![]()
![]()
$curl = curl_init();

curl_setopt_array($curl, array(
  CURLOPT_URL => 'https://email.floppysend.com/api/v1/lists/{list_uid}/subscribers/{subscriber_uid}/subscribe?api_token={your_api_token}',
  CURLOPT_RETURNTRANSFER => true,
  CURLOPT_ENCODING => '',
  CURLOPT_MAXREDIRS => 10,
  CURLOPT_TIMEOUT => 0,
  CURLOPT_FOLLOWLOCATION => true,
  CURLOPT_HTTP_VERSION => CURL_HTTP_VERSION_1_1,
  CURLOPT_CUSTOMREQUEST => 'PATCH',
));

$response = curl_exec($curl);

curl_close($curl);
echo $response;
require "uri"
require "net/http"

url = URI("https://email.floppysend.com/api/v1/lists/{list_uid}/subscribers/{subscriber_uid}/subscribe?api_token={your_api_token}")

https = Net::HTTP.new(url.host, url.port)
https.use_ssl = true

request = Net::HTTP::Patch.new(url)

response = https.request(request)
puts response.read_body
//The OkHttpClient is an external package, you need to install it before making the request,
//And don't forget to add user permission for the internet inside "\MyApplication\app\src\main\AndroidManifest.xml"
//Also, you need to add required dependencies inside "MyApplication\app\build.gradle"

OkHttpClient client = new OkHttpClient().newBuilder()
  .build();
MediaType mediaType = MediaType.parse("text/plain");
RequestBody body = RequestBody.create(mediaType, "");
Request request = new Request.Builder()
  .url("https://email.floppysend.com/api/v1/lists/{list_uid}/subscribers/{subscriber_uid}/subscribe?api_token={your_api_token}")
  .method("PATCH", body)
  .build();
Response response = client.newCall(request).execute();
var client = new RestClient("https://email.floppysend.com/api/v1/lists/{list_uid}/subscribers/{subscriber_uid}/subscribe?api_token={your_api_token}");
client.Timeout = -1;
var request = new RestRequest(Method.PATCH);
IRestResponse response = client.Execute(request);
Console.WriteLine(response.Content);
//Make sure to import Axios and install npm packages before doing the request

var axios = require('axios');

var config = {
  method: 'patch',
  url: 'https://email.floppysend.com/api/v1/lists/{list_uid}/subscribers/{subscriber_uid}/subscribe?api_token={your_api_token}',
  headers: { }
};

axios(config)
.then(function (response) {
  console.log(JSON.stringify(response.data));
})
.catch(function (error) {
  console.log(error);
});
Unsubscribe A Subscriber
Unsubsriber a subsriber from a list with one click with FloppyEmail API,
Follow the instructions and ingrate
our API with your system or application
Parameters
-
PATCH METHOD
https://email.floppysend.com/api/v1/lists/{list_uid}/subscribers/{uid}/unsubscribeYou can get your API Token from the integration section in the dashboard
https://email.floppysend.com/api/v1/lists/{list_uid}/subscribers/{subscriber_uid}/unsubscribe?api_token={your_api_token}
Note:
Due to data protection reasons the API is only accessible via HTTPs with TLS versions 1.0, 1.1 or 1.2.
|
Parameter |
Type |
Required |
Description |
|---|---|---|---|
|
api_token |
string |
Yes |
Your api token |
|
subscriber_uid |
string |
Yes |
Subscriber uid |
|
list_uid |
string |
Yes |
List uid |
Response
|
Key |
Value |
|---|---|
|
message |
Response message |
{
    "status": 1,
    "message": "Unsubscribed"
}
|
Http Error Code |
Error Key |
Error Description |
Note |
|---|---|---|---|
|
404 |
message |
List not found |
List uid invalid |
|
404 |
message |
Item not found |
Subscriber uid invalid |
Note:
If api_token was missing you will be redirect to login page
Code Sample
![]()
![]()
![]()
![]()
![]()
$curl = curl_init();

curl_setopt_array($curl, array(
  CURLOPT_URL => 'https://email.floppysend.com/api/v1/lists/{list_uid}/subscribers/{subscriber_uid}/unsubscribe?api_token={your_api_token}',
  CURLOPT_RETURNTRANSFER => true,
  CURLOPT_ENCODING => '',
  CURLOPT_MAXREDIRS => 10,
  CURLOPT_TIMEOUT => 0,
  CURLOPT_FOLLOWLOCATION => true,
  CURLOPT_HTTP_VERSION => CURL_HTTP_VERSION_1_1,
  CURLOPT_CUSTOMREQUEST => 'PATCH',
));

$response = curl_exec($curl);

curl_close($curl);
echo $response;
require "uri"
require "net/http"

url = URI("https://email.floppysend.com/api/v1/lists/{list_uid}/subscribers/{subscriber_uid}/unsubscribe?api_token={your_api_token}")

https = Net::HTTP.new(url.host, url.port)
https.use_ssl = true

request = Net::HTTP::Patch.new(url)

response = https.request(request)
puts response.read_body
//The OkHttpClient is an external package, you need to install it before making the request,
//And don't forget to add user permission for the internet inside "\MyApplication\app\src\main\AndroidManifest.xml"
//Also, you need to add required dependencies inside "MyApplication\app\build.gradle"

OkHttpClient client = new OkHttpClient().newBuilder()
  .build();
MediaType mediaType = MediaType.parse("text/plain");
RequestBody body = RequestBody.create(mediaType, "");
Request request = new Request.Builder()
  .url("https://email.floppysend.com/api/v1/lists/{list_uid}/subscribers/{subscriber_uid}/unsubscribe?api_token={your_api_token}")
  .method("PATCH", body)
  .build();
Response response = client.newCall(request).execute();
var client = new RestClient("https://email.floppysend.com/api/v1/lists/{list_uid}/subscribers/{subscriber_uid}/unsubscribe?api_token={your_api_token}");
client.Timeout = -1;
var request = new RestRequest(Method.PATCH);
IRestResponse response = client.Execute(request);
Console.WriteLine(response.Content);
//Make sure to import Axios and install npm packages before doing the request

var axios = require('axios');

var config = {
  method: 'patch',
  url: 'https://email.floppysend.com/api/v1/lists/{list_uid}/subscribers/{subscriber_uid}/unsubscribe?api_token={your_api_token}',
  headers: { }
};

axios(config)
.then(function (response) {
  console.log(JSON.stringify(response.data));
})
.catch(function (error) {
  console.log(error);
});
Delete A Subscriber
Delete a subsriber from a list with one click with FloppyEmail API,
Follow the instructions and ingrate
our API with your system or application
Parameters
-
DELETE METHOD
https://email.floppysend.com/api/v1/lists/{list_uid}/subscribers/{uid}/deleteYou can get your API Token from the integration section in the dashboard
https://email.floppysend.com/api/v1/lists/{list_uid}/subscribers/{subscriber_uid}/delete?api_token={your_api_token}
Note:
Due to data protection reasons the API is only accessible via HTTPs with TLS versions 1.0, 1.1 or 1.2.
|
Parameter |
Type |
Required |
Description |
|---|---|---|---|
|
api_token |
string |
Yes |
Your api token |
|
subscriber_uid |
string |
Yes |
Subscriber uid |
|
list_uid |
string |
Yes |
List uid |
Response
|
Key |
Value |
|---|---|
|
message |
Response message |
{
    "status": 1,
    "message": "Deleted"
}
|
Http Error Code |
Error Key |
Error Description |
Note |
|---|---|---|---|
|
404 |
message |
List not found |
List uid invalid |
|
404 |
message |
Item not found |
Subscriber uid invalid |
Note:
If api_token was missing you will be redirect to login page
Code Sample
![]()
![]()
![]()
![]()
![]()
$curl = curl_init();

curl_setopt_array($curl, array(
  CURLOPT_URL => 'https://email.floppysend.com/api/v1/lists/{list_uid}/subscribers/{subscriber_uid}/delete?api_token={your_api_token}',
  CURLOPT_RETURNTRANSFER => true,
  CURLOPT_ENCODING => '',
  CURLOPT_MAXREDIRS => 10,
  CURLOPT_TIMEOUT => 0,
  CURLOPT_FOLLOWLOCATION => true,
  CURLOPT_HTTP_VERSION => CURL_HTTP_VERSION_1_1,
  CURLOPT_CUSTOMREQUEST => 'DELETE',
));

$response = curl_exec($curl);

curl_close($curl);
echo $response;
require "uri"
require "net/http"

url = URI("https://email.floppysend.com/api/v1/lists/{list_uid}/subscribers/{subscriber_uid}/delete?api_token={your_api_token}")

https = Net::HTTP.new(url.host, url.port)
https.use_ssl = true

request = Net::HTTP::Delete.new(url)

response = https.request(request)
puts response.read_body
//The OkHttpClient is an external package, you need to install it before making the request,
//And don't forget to add user permission for the internet inside "\MyApplication\app\src\main\AndroidManifest.xml"
//Also, you need to add required dependencies inside "MyApplication\app\build.gradle"

OkHttpClient client = new OkHttpClient().newBuilder()
  .build();
MediaType mediaType = MediaType.parse("text/plain");
RequestBody body = RequestBody.create(mediaType, "");
Request request = new Request.Builder()
  .url("https://email.floppysend.com/api/v1/lists/{list_uid}/subscribers/{subscriber_uid}/delete?api_token={your_api_token}")
  .method("DELETE", body)
  .build();
Response response = client.newCall(request).execute();
var client = new RestClient("https://email.floppysend.com/api/v1/lists/{list_uid}/subscribers/{subscriber_uid}/delete?api_token={your_api_token}");
client.Timeout = -1;
var request = new RestRequest(Method.DELETE);
IRestResponse response = client.Execute(request);
Console.WriteLine(response.Content);
//Make sure to import Axios and install npm packages before doing the request

var axios = require('axios');

var config = {
  method: 'delete',
  url: 'https://email.floppysend.com/api/v1/lists/{list_uid}/subscribers/{subscriber_uid}/delete?api_token={your_api_token}',
  headers: { }
};

axios(config)
.then(function (response) {
  console.log(JSON.stringify(response.data));
})
.catch(function (error) {
  console.log(error);
});